English Paper Piecing (EPP)
with basting thread left in
A *very* brief background: I thought I wanted to learn EPP because I needed a portable, small, easily-transported project to work on when I wasn't at home. EPP sounded ideal. It turned out that it *is*. It's easy to cut the paper templates and fabric at home, so that all you need to when "on the road" is to sew.
I've tried MANY, MANY techniques and they didn't appeal to me for one reason or another. I'm basically lazy. I don't want to do steps that need to be undone later on. I don't like freezer paper templates because I need an iron. I don't like glueing the seam allowances to the template because it's annoying to unstick the fabric without fraying. I absolutely HATED basting *through* the paper templates because then you have ANOTHER step to REMOVE the basting thread. Additionally, if you use plastic templates, you CAN'T sew through them! BAH.
But then, I discovered "someone's" technique of stitching a simple back-stitch JUST IN THE CORNERS on the back side of the template, *not* sewing through the template, just catching the fabric. You leave the basting thread IN the fabric .. you never remove it! It's certainly not going to impede the stitching together of the shapes nor of the quilting. This was revolutionary!
After using my "good" thread for the basting .. and being unhappy about using my "good" thread (let's face it, Aurifil is expensive), I came upon a solution. Years ago, I had inherited a LOT of small wooden spools with thread from my mother-in-law. I loved the little wooden spools but had no use for the 40 (and more) year old thread. I had trust issues with the structural strength of that thread! I also did not want to spend hours unreeling the thread to throw it away. Then I realized that the thread, although not strong enough to sew with, was certainly strong enough to BASTE with! So, now I am using all my "junky" thread to do the basting! win/win!
So, on with the tutorial:
I used to cut my paper templates by hand/rotary cutter after drawing them on paper with a hexagon ruler. This was exceedingly tedious, but it worked. Then I discovered the Fiskars brand paper punches! They come in small, medium and large sizes. By being able to PUNCH the shapes out, it was very quick and most importantly, they were all the SAME SIZE.
A word about hexagon sizes: the conventional terminology references the distances ALONG THE EDGE as the "size" of the hexagon. So, when you read about a 1" hexie, that is the length of one of the SIDES. NOT point to point. NOT top to bottom. You need to be aware of this because some hexie rulers do NOT follow this convention. I found that out the hard way.
 The small punch creates hexies 1/2", the medium creates hexies 3/4" and the large creates hexies 1" ... as measured *along the sides*!
You can make your hexies out of almost anything that will give you a firm edge to fold the fabric over. A lot of quilters will use those obnoxious loose leaf, stiff paper inserts that come in magazines (although if you use stiff paper, you'll also need to paper punch a small hole in the middle .. I'll show you why later on). Most of my template are regular computer/copy paper. I use the bad results of anything we print, i.e. scrap paper. I don't care if there is printing on the paper or not. When I use computer paper, I do *not* punch a hole in the center of the template because it's easy enough to slide a pin right through the paper.
The downside of computer paper is that *eventually* it will become "soft" and wrinkled. However, having said that, I have used my paper templates over and over and over and over ... as long as I have a firm edge to fold the fabric over, I don't care if the template is pin-pricked and wrinkly. :-) All righty then .. so now you have all the templates you think you'll need. Make more. Honestly, you can't have enough of them.
Now you need to cut your fabric pieces. Initially, I absolutely cut the fabric into hexagons, slightly larger than the template. After stitching/basting the fabric on the back, it sure looked pretty! But ya know? NO ONE looks at the back side of your hexagons once its been quilted. And I kept misjudging how much extra fabric I needed for a good seam allowance .. I was typically short changing myself. Very annoying. Cutting the fabric into hexagons also took up an inordinate amount of time. Remember .. I'm very lazy, so this process was becoming tedious.
Then, I realized .. hey ... why not just cut the fabric into SQUARES? Yeah, some of the seam allowances will be longer than the others, but WHO CARES? Certainly not me! Cutting squares was a whole lot easier than fussy cutting hexagons!
 So, now you have your pile of hexagons and a corresponding pile of fabric squares. When I'm doing Grandmother's Flower Garden, I usually bunch my fabrics into piles of 6 pieces then baste that pile together with a big, ol' stitch .... stab down from one side, make a U turn and come right back up and clip the end of the thread, leaving a nice tail. Both tails will be on the same side of the stack of fabric piecees. Counting them in stacks of 6 made sure that I had enough of a fabric to make a complete flower.
 Take your hexagon ... in this case, it's a paper hexagon ... place it in the center of a fabric square and use a straight pin to secure the template (right through the paper) to the fabric. This just ensures that the template isn't going to shift around as you fold the fabric over its edges.
If your template is plastic or that stiff insert paper, you should have a hole punched in the center of the template. You'll be able to see the fabric through that hole. Stick your pin into the fabric and come out the other side of the hole .. you'll see an example further down.
 Here you start the folding of the fabric over the edges of the template. All the folding will be this same technique. Oh .. I'm right handed, so I turn the hexie clockwise. If you're left-handed, you might need to do everything in mirror-image.
Start on any side, although I like to start near the head of the pin so it will be handy when I need to remove the pin. Fold the fabric over the edge of the template. Crease it firmly with your fingers. You don't need to mash it down, just give it a good "press".
 Now, turn clockwise, one edge. I like to lay my needle along the edge of the template, on top of the fabric. I feel it gives a firmer edge to fold the fabric over against. I've gotten so used to doing this that it's second nature. If you don't feel like doing this, feel free to omit this part and just fold the fabric over teh edge of the template.
You'll see that I snapped the picture a tad too soon! The red line is where the needle OUGHT to be prior to folding! I didn't realize this at the time and I didn't feel like re-doing the shot. My bad. :-)
 So, now you see the second side of the hexie has been folded over its edge.
 Time to take a backstitch! I've threaded my needle with some "junky" thread. No need to knot the end. I stick the point of the needle through the overlapping fabric at the corner until the tip hits the template .. you'll hear it .. and then take a small scoop of fabric, pull the thread through and complete the backstitch. You can tug a tad, just to make sure the stitch is secure. Or not .. your call.
Do not tie off the backstitch! No need to. You're going to simply drag the thread from corner to corner. Don't pull that connecting thread because you don't want it tight .. that will just cause the hexie to sorta fold up on itself: not good.
 Turn the hexie clockwise, and as before, lay the needle down on the edge of the template to provide a nice firm edge to fold the fabric over. Crease with your fingers before folding over.
 Fold the fabric over. Crease it. As before, take a backstitch.
The rest of the sides of the hexie are done exactly the same way: turn, crease, fold, backstitch turn, crease, fold, backstitch. repeat, repeat, repeat. When you get to the last side, you'll need to remember to REMOVE THE PIN before folding the fabric over.
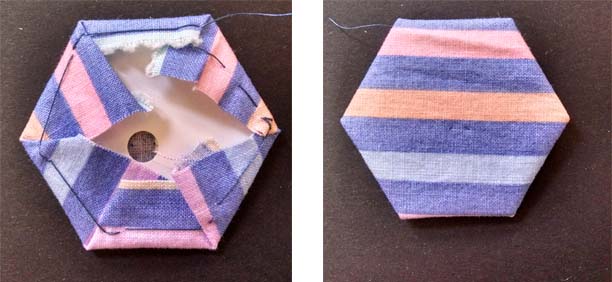
 This is what the back will look like when you've completed all the backstitches. Now, at this point, if you wanted to, you could press the hexie flat. Typically, I'm not at home and don't have an iron nearby, so I don't. If I think about it when I do return home, I might press all the hexies that I had made .. then again, maybe not.
I have found that, yes, the *pressed* edge is nice when you are stitching the hexies together but it is NOT absolutely necessary. I've stitched many, many, many hexie flower units together without the individual hexies being pressed flat and the flower unit has come out just fine.
 What you'll end up with is a nice collection of basted hexies, ready for the next step. :-)
 Now .. what about that hole in the center of the template that I mentioned previously? Well, in most of the commercially available templates that I've seen, there is a hole in the middle. And if you make your own templates out of stiff paper (or plastic), you're going to need to punch a hole in the center yourself. This is for the very simple reason that you just can NOT stick a pin through a plastic template nor that stiff paper! You could just hold the template in place against the paper, but chances are, it's going to slip a bit, which could result in not enough fabric for all the seam allowance fold overs. Maybe, maybe not.
BUT, if there's a hole in the center, you can just slip the pin in and out of the hole, catching the fabric. Bingo! All secure!
 One more item .. if you're using striped fabric or a fabric that has a distinctive design, it is helpful put put one of the STRAIGHT edges against a stripe (or design). While I'm not always aware or even concerned about making sure the fabric straight of grain is aligned with a template straight edge (although, strictly speaking, you probably should be), when I'm using stripes, I know it will drive me NUTS if those stripes are going every which way on the finished flower. If you align a straight edge of the template with the edge of a stripe, not only are you assuring that the fabric will be on-grain with a straight side (as opposed to a "bias" edge), when you start stitching the hexies together, all the stripes will line up nicely against each other at the seam line. That makes my eyeballs happy.
Sometimes SEEING it done is better than reading about it, I made a very short video (under 4 minutes) of the process that I've described above. And then, as I was uploading that video to YouTube, I discovered that ... oh, silly me .. I had *previously* done two other videos on EPP prep in 2016!
I had done it in two parts: Part 1 is about 6 minutes long and then I took a break to make the rest of the hexies. I picked it up in Part 2 which is only 1-1/2 minutes!
So, now you have two different sets of video tutorials to look at.
And finally, because I like to have written directions in front of me while I am learning (or re-learning!) a skill, here is a PDF of this tutorial.
I hope this is helpful and if you have any questions, you can email me with the link below.