A Tote and Collection of little bags

Well, due to family logistics, etc, Mr. Pirate's cousin's families and we weren't really around each other when everyone was younger and it is only fairly recently that we have become "reacquainted" with the first cousin/once removed and his family ... his wife and delightful three children. When you actually MEET your relations when everyone is an adult, your relationships are quite different than if you grew up with them. And so it is with this young family ... they really are the most hard-working and wonderful people; completely unassuming and unpretentious.
I kinda took a shine to Jolene, probably because I have three daughters of my own and I can relate to girls rather than boy children. Nothing wrong with boy children, of course ... where would the human race be without them? :-)
Now, over time, I have amassed a fair amount of pattern from online sources for some of the cutest tote bags and organizational kind of bags. I've never actually made anything from most of them because, truth be told, I just don't have a need for them. But, dang! they are cute! :-)
So, enter Jolene and me remembering that I have this messload of awfully cute patterns that I could make into a (somewhat) coordinated set for her. Does she need them? Heck if I know! But I bet she'll find some sort of use for them over time.
The Tote Bag
First up, the tote bag. Everyone needs a big, ole tote bag to haul stuff around. They are very handy, as well as useful. Jolene's favorite color is turquoise, so I went stash diving and hauled out all the turquoise and coordinating fabrics that I had on-hand. And then I started to match up which fabrics would be best to be used with what patterns ... and, indeed, WHICH patterns to use. (Because I also intended on making a tote and set of bags for the Mom, too .. cuz she's pretty awesome and I don't particularly want to repeat the patterns I'm using for Jolene.)
Back to the tote bag: from Terrie Sandelin's lovely website, I found her instructions for a tote bag that featured, among other things, a faux top binding that is created by the lining fabric. When you look at that PDF, you will see that feature is NOT what is the focus of the tote pattern! What she is actually giving you instructions for is how to make the miniature quilt for use as the outer pockets. Well, I didn't want to piece the pockets, as I had some focus fabric of my own that I wanted to use. In my stash, I had a celestial focus fabric in turquoise .. just enough scraps, really ... to be able to make two exterior pockets.
 I also like the fact that she included inner patch pockets: one full width and the other is divided into two segments. After the tote was completed, I realized that the full width pocket really was too floppy for my taste, which necessitated my retrofitting a dividing line, by hand no less, to create separate compartments. I hope that it holds. I couldn't machine sew a dividing line because the pocket was in the way. Perhaps if I had interfaced that pocket piece with a stiff interfacing, it wouldn't have been so floppy, but I didn't realize it at the time. Live and learn.
I found her tutorial easy enough to follow. In reality, it's just a very basic tote bag; very much like so many other tote bag tutorials and patterns available. So, if you already have a pattern or directions that you like, you should stay with it. You can always modify your directions to incorporate features that you see in other totes that aren't included in yours.
One aspect that I didn't follow was how she boxed the corners. She has you cut out corner squares, align the raw edges for a seam allowance and thus creating the boxed bottom. You really don't need to cut out those corners ahead of time. In fact, doing so makes me nervous to a certain degree because once you cut something, it's irreversible. To box corners, I like to form a triangle with the bottom and the sides and sew across it forming the box. If it's not the size you want, the stitching is easily removed to be redone.
 One item that I didn't really take into consideration is how long she specified the straps should be, so I made them as she indicated. Well, they turned out to be long enough for *me* to sling over my shoulder comfortably! They would be waaaay too long for a pre-teen girl!
To rectify this problem, I cut the straps off and re-did them as adjustable straps. Luckily, I just happened to have the hardware to do that. From someplace long ago, I had acquired two "bone" sliders that really matched the color of the straps nicely. I also had (from another project), colored rings that connected the adjustable part of the strap to the tabs that are permenently attached to the tote itself. The turquoise rings really add a nicely coordinated contrast.
I did have to look up how to do the adjustable strap part, though. I found *wonderful* instructions on precisely how to construct the adjustable straps. You've seen these straps everywhere but until you need to make them yourself, you just can't figure out how to do it properly. :-)
Another addition I did was to make a very firm but removeable bottom for the tote. I bought a sheet of foam board, cut it to size and covered it with the lining fabric. It adheres to the tote bag bottom by a strip of Velcro. It can be removed if the tote bag ever needs to be laundered.
The Drawstring Bag
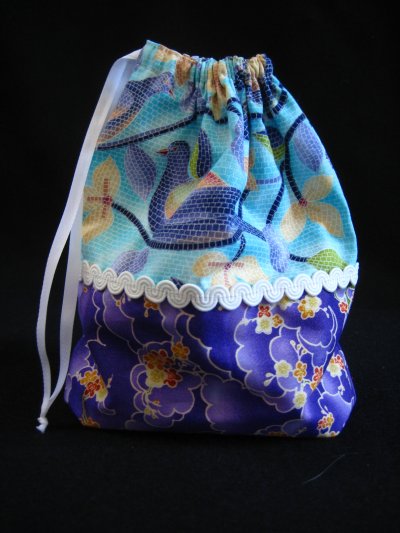 Drawstring bags are easy enough but THIS one has a flat bottom! But it isn't created by boxing the corners! Very cleverly constructed "pleats" make the flat bottom on this drawstring bag .. and that was precisely why I wanted to make it .. a new technique for me to learn!

I found this pattern at A Spoonful of Sugar Designs.
The squiggly trim came from a stash I inherited from my mother-in-law (who is not related to Jolene in any way). I was happy to be able to find a good use for this lovely trim.
![]() The Dumpling Bag
The Dumpling Bag
 This is just the most adorable little bag EVER! Definitely cuter than a bug's ear! :-) I found the tutorial at Michelle Patterns.
Instead of using a single fabric for the sides, I created a patchwork of scraps. If I was really feeling magnanimous, I would have embellished the seams, ala a Crazy Quilt, but I'm envisioning these bags being thrown about and generally *used*, so I opted not to put on any decorations that might require more delicate handling.
 I do like the fact that the designer put in a lining and finished off the bottom seams. Having a lining in a bag always makes it last longer and just makes it look prettier.
![]() The Humbug Bag
The Humbug Bag
 You've probably all seen these darling little bags that seem to be an impossibly shaped triangle, commonly called a 'humbug bag'. I found the pattern at Robin Quilts Etc (just scroll down until you see the "Triangle Zipper Bag" tutorial on the left hand side).
What you don't realize is that this bag is really a *rectangle*! To get that Escher-esque, impossible look, you simply sew the ends of the rectangle in opposite directions! It's amazing how simple it is, once you know the "trick"!
The *only* complaint I have is that the lining came out rather baggy. I like the linings to be somewhat snug, so you don't get tangled up in the lining fabric whilst you are groping around for whatever is in the bag. But, honestly, that is a minor complaint in relation to the sheer cuteness factor.
![]() A Small Notebook
A Small Notebook
 Who doesn't need a small notebook for taking down important information? The basic directions are on Sue Bleiweiss' blog, available as a PDF, as her "Cereal Box Booklets" but I actually saw them on Marty's Fiber Musings, made with fabric instead of paper.
I didn't use cereal boxes but thin cardboard that I had on-hand. Mine is still a little on the rounded side, but that will flatten out in time.
 Instead of hand-sewing the booklet together, I decided to machine stitch two parallel lines down the center. I figured that if Jolene ever tore out one page, the double-stitched center would hold all the remaining pages together.
I also included a turquoise ink pen. I wonder how long .. or short ... of a time it will take until the pen is lost. It's just inevitable. :-)
![]() The Zipper Purse
The Zipper Purse
 I saw this small double zipper "messenger" style purse on Pinterest and thought it looked awfully familiar.
Even though I thought I thoroughly searched through my pattern resources, I couldn't find what I thought I was looking for. However, I was not to be deterred and reverse engineered the purse from the picture.
This flat purse features a double zipper that opens up into two separate compartments. The strap is attached with a swivel connection and is usually small enough to hold just the essentials.
To help define the edges and create a more finished appearance, I sewed contrast piping in the perimeter seam. You can NEVER go wrong with adding piping! Personally, I adore piping. :-)
![]()
 Although the fabric is blingy enough with the foil stars, I thought that adding a needle-turn applique "J" to the front would be a neat embellishment.
 I have to admit that by this time, I was kind of tired of using fabric straps. For this purse, I wanted something different but wasn't entirely certain of what that "different" was.
It needed to be strong, pliable and in proportion to the purse itself. Ultimately, I decided that a braided strap was the way to go .. but what to braid? Fabric tubes would be on the bulky side but .. oh gosh! .. PARACORD! That was just the ticket!
At one of our local hobby stores, I was exceedingly fortunate to find TURQUOISE paracord. Lordy, lordy .. was I in seventh heaven or what? How utterly LUCKY could I possibly be? :-)
The only quibble I has was the manner in which I attached the strap to the swivel connectors. What I really wanted was silver cones to stuff the ends of the paracord into but I was unable to find them. And, me being the impatient creature that I am, I was unwilling to WAIT for an online order, especially since I wasn't 100% sure if what I wanted existed or what sort of size I needed. So, I made fabric tabs. Not especially elegant, but they do work.
It wasn't until I was rummaging around my sewing studio for something else entirely that I *found* the pattern that I knew I had all along! It's the "Runaround Bag" by Lazy Girl Designs. It only has one zipper, but it's the bag, all right.
The Ubiquitous Zipper Bag
 For my very last item of the collection, I made the ever-present, simple zipper bag. I did box the bottom because I think that is just more useful than having a flat bag.
Now, in looking through my notes, I can't find a specific pattern or set of directions that I followed, but you can find this sort of bag EVERYWHERE. If not, it's not terribly difficult to wing it on your own.
![]()

 The interior is lined so it looks tidy. Since the side of the bag is large enough to cry out for embellishment (but I hadn't thought about that beforehand, otherwise, I just might have paper-pieced something cute or done an embroidery design), I put 3 Whimsey Roses on the front. Not knowing if Jolene would like the little flowers, I put them on pinbacks, so they can be easily removed without marring the purse itself.
Don't know what Whimsey Roses are? Well, gosh .. let me direct you over to Kari Mecca's Pinterest board. She has designed the easiest way to create what look like ribbon roses .. but there's a wonderful twist to it! (literally!)
I also did a blog post on it when I was learning how to make them. They are so adorable you get kind of addicted to making them, even if you have absolutely NO use for them. :-)
And THAT'S what I've been working on for the past month or so!