Baby Urban Abacus
for Senia

One of Mr. Pirate's nieces recently had a baby girl, who was named Senia. I had seen a new pattern by Jenny Pedigo, called "Urban Abacus". Although she had done hers with scrappy black and white prints, I was seeing columns of the same fabric ... kinda like beads on a string.
As for the vertical "string" between the beads, I was incredibly fortunate to find some zipper novelty fabric. I took one look at those zippers and realized that I could FUSSY CUT them so that the strings between the beads would be zippers!! How cool is that? :-) So, I bought an amount I thought would be adequate. Do you hear jangling bells in your head? Cutting to the chase .. it was close. Doggone close! Because of the width of the vertical string, I could only use *every other zipper*!! OH. MY. GOSH. That meant that I just had my available zippers cut in half! I was slightly anxious for a while until I realized that I would just squeak by. I got all the zipper segments that I needed!
Yes, the blocks in this quilt involve curved seaming. But those curves are *very* gentle. This is not a difficult block to make! However, I realize that curved seaming is a daunting task to some, so I am going to show you how I attacked those seams.
| 1. Find the center of the curved edge on both the bead and the background piece. In this picture, I marked the center of the bead with a pin. For the background piece, I simply folded it wrong sides together and matched the fold with the pin ... which put the right side of the bead fabric to the right side of the background piece. |  |
| 2. I take the pin that was in the bead and secure both the bead and the background fabric with it. Then I gently, gently, align the raw edge of the top half of the background with the raw edge of the bead. I use about 3 pins |  |
| 3. At the top edge, I sink the needle into both pieces of fabric to hold them in place and remove the first pin. Then gently, gently .. often with the help of the point of my seam ripper as a stiletto to keep the fabric in place, I sew with a short stitch with a 1/4" seam allowance. I sew from pin to pin, stopping at each pin to pivot, if needed, and to remove the pin. Generally speaking, I try not to sew over pins. This is a very gentle curve and you shouldn't have any apprehensions about sewing it. | 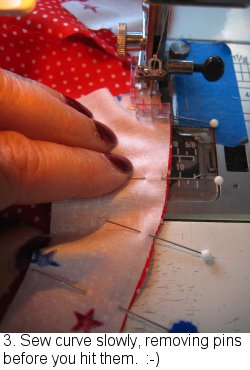 |
| 4. Now, you're at the center part and you are going to start on the other half of the curve. | 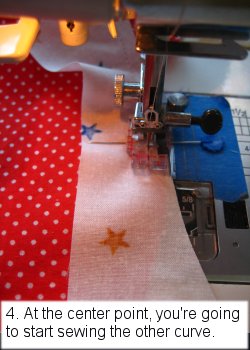 |
| 5. You really don't need to pin the rest of curve. It's very gentle. What I do is: keeping the bead fabric (which is on the bottom) in place, I gently (and I do mean GENTLY) pull a SMALL section of the background fabric so that the raw edges match. You're not going to be matching the entire curve! It's just a SMALL section! Sew just that small section. Repeat with another SMALL section of the background fabric. Repeat until you reach the end. |  |
| 6. Voila! Your cuve is sewn! Now you get to repeat the entire process with the other side! :-) Once you have sewn both background pieces to the bead, you may find that the tops and bottoms don't match up. At least this happened to me. A lot of my blocks even had the sides of the background pieces that weren't straight. So annoying. In any case, you can't leave the edges uneven because uneven edges will make sewing the blocks together a real nightmare. Maybe I just don't have good karma. ::shrug:: |  |
| 7 & 8. What I did was to even up the edges .. all 4 edges .. removing just as LITTLE fabric as I needed to. I also made sure that all the bead blocks were of the same size .. uniformity in sizes is a Good Thing in quilting. Unfortunately, all the trimming DID make the blocks slightly smaller. But, since all the blocks were the SAME smaller size, it really doesn't matter what the final size is. At least to me, it didn't. | 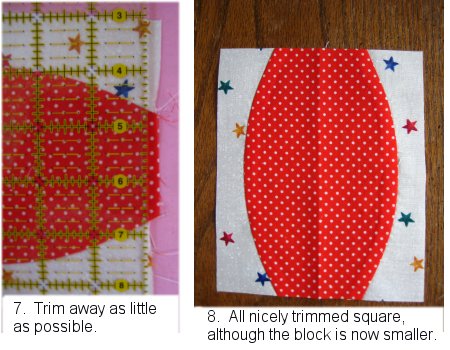 |
Once the top was pieced, I loaded it sideways onto my longarm frame. I deliberately loaded it sideways because I wanted the columns to be horizontal, so that I could quilt them in a single pass. If I had loaded the quilt in the normal "portrait" orientation, the columns would have been running up-and-down, which would mean that in order to quilt a column, I would need to advance, advance, advance the quilt then re-roll it back to the top. I avoid *that* as much as possible.
After thinking quite a bit about how I wanted to quilt this quilt .. and doing a Google/Image search for "Urban Abacus" so see what other quilters were doing, I decided that I would stitch-in-the-ditch along all the edges. All. The. Edges. My goodness, that was tedious. BUT .. it really needed to be done because, that stitch-in-the-ditch not only would define the beads on a string, but it would stabilize the quilt so that I could roll it back and forth, as needed, and I wouldn't get nasty wrinkles on the back ::crossing fingers:: ::no sense in tempting fate::
Now, it was easy enough to go up one side of the beads and zipper strip and down the other because I was using a white thread which matched the color of the background fabric. I'm getting better at stitch-in-the-ditch but I'm not absolutely 100% perfect yet. Sometimes, that silly machine kinda veers on its own ... and in that case, I don't want my errant stitching to be emphasized by a contrasting thread!
Unfortunately, I absolutely did NOT want white thread for the quilting of the beads themselves. I looking at my layout, I knew, deep down inside, that I needed to quilt each bead with a coordinating color thread. Furthermore, there was simply no way that I could do a continuous line of stitching from bead to bead. Oh no. Sadly, it meant that I needed to quilt each bead independently, which in turn meant .... So. Many. Starts. And. Stops. Oy vey! But, I gotta admit, it was worth it. Furthermore, since this is a baby quilt, it really didn't take THAT long. :-)
 To quilt the beads, I opted for a criss-crossing loop design, like a bunch of stretched out figure 8s. My eyes like uniformity best. If a design is to be done "just so", then for me, it's got to be as nearly "just so" as I can make it. Bearing in mind that I do not have a computerized longarm. It's just little, ol' me free-motion quilting.
 Free-motion quilting means that for me to achieve any sort of uniformity, I needed to have some sort of guidelines to help me get those loops relatively in the same place in all the beads. To achieve THAT, I made a marking template. I traced the curve of the bead onto paper. Then I marked spots for the top and bottom curves where the loops were to hit. There were four marks for the top edge (as shown by the dark Ts (for Top)) and three marks for the bottom (as shown by the lighter Bs (for Bottom)). I held this curved paper template up against each side of the bead and marked with a chalk wheel where those places were. I have done this before on other quilts and know that the chalk marks will wash out nicely.
 When I started the quilting, I would just aim for the tick marks on the edge of the bead for where the loop of the design was to go. For the most part, this method worked out wonderfully and I'm pleased with the outcome. However, because this is not a computerized longarm machine and a mere human is guiding it, ... ummm ... "variations" are bound to happen. :-) So, not EVERY bead is quilted exactly the same. They are MOSTLY the same. This poor green bead's quilting is slightly askew. Not much, but I know it's not placed correctly.
However, in the Grand Scheme of Things, once the quilt is washed, dried, is spit upon, dragged in the backyard, etc, etc, etc ... no one is going to even notice that some of the beads are not quilted 100% perfectly. This doesn't bother me in the least!

 You can see the texture that the quilting produced better from the back of the quilt.
Since there were so many colors used in the quilt, I didn't want to use just one color for the binding. I didn't want to emphasize any one color. So, I made my own striped binding with ALL the fabrics used for the beads! I simply made a strip set of the bead fabrics and made my bias binding using that strip set as though it were a regular piece of fabric. It resulted in the most delightful diagonal striping!

 Lastly, the labels. Normally, for family quilts, I always use my pirate persona label. I don't use this label on charity quilts; I consider it a special label. So, the pirate label was tucked into one corner.
But, I also own an embroidery machine. It's a basic Janome 300e, but it does everything that I have wanted it to do. It's a dandy little machine. Sadly, I tend to forget about it. I've been trying to remember to haul it out and make a second, embroidered label for family and gift quilts. And I did do so for Senia's quilt!
![]()
![]() In addition to the quilt, I also made a soft cotton knit and flannel receiving blanket. This pattern has been making the rounds lately .. it's the one where it produces lovely mitered corners. Once you've made one and see what the technique is, all subsequent ones go very quickly.
In addition to the quilt, I also made a soft cotton knit and flannel receiving blanket. This pattern has been making the rounds lately .. it's the one where it produces lovely mitered corners. Once you've made one and see what the technique is, all subsequent ones go very quickly.
The double layered receiving blanket is just so much nicer than commercial ones!
I also machine embroidered Senia's name diagonally across one of the corners.
The challenge for me is going to be .... getting this packaged up and in the mail! For whatever reason, actually GOING to the post office is a real road block. I'm not sure why but I really need to push myself to gather up the letters & packages and drive the *2 minutes* it takes to get there! I can't believe how lazy I can be. :-)