Jelly Parfait
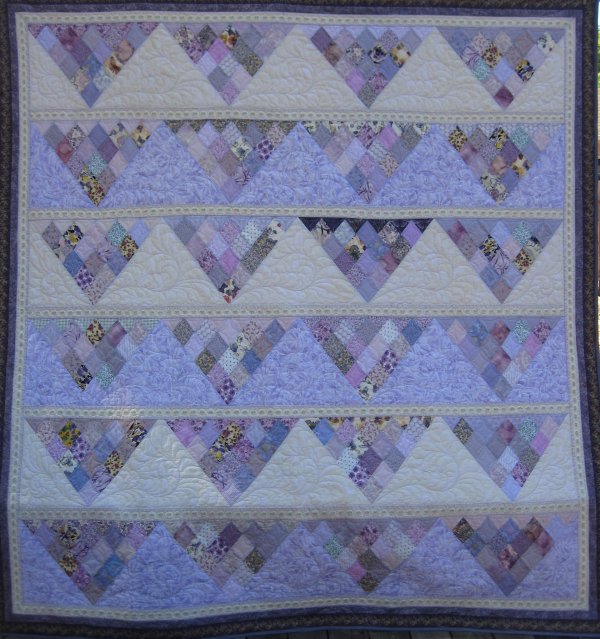
size: 86" x 90"
Background: I was working on another mega-quilt that featured diamonds. I ran out of the sashing fabric and while waiting to purchase the extra I needed, I started Jelly Parfait. In fact, I *finished* Jelly Parfait and the other quilt is still a WIP. :-)
At home, waiting for the extra sashing fabric, I was twiddling my thumbs. I really, really, really can't stand being idle in the sewing room. All the leftover diamonds from other quilt were staring at me and I decided to fill the time by "doing something" with some of those diamonds.
I came across Fig Tree & Company's pattern "Jelly Parfait". *Perfect*! I even had some fabric already in my stash that I could use for the setting triangles! On a Monday, I began to sew the diamonds together to form the triangles for Jelly Parfait. Four large triangles per row, 6 rows = 24 large pieced triangles. Each triangle needed 15 diamonds plus 6 setting triangles.
The sashing fabric arrived. However, I knew .. I *knew* ... that the in-progress Jelly Parfait was going to nag me. The other quilt is going to take a substantial amount of time and I just didn't want to put Jelly Parfait on hiatus for the duration ... because I was concerned (knowing me) that I wouldn't get back to it for a while.
Sooooo ... work continued on Jelly Parfait during the next week until it was done. By the following Sunday (that is to say, 7 days later), the top was done. Man, I was happy about that! It was getting awfully B-O-R-I-N-G sewing those diamonds into a large triangle.
There are some differences between my version and the actual pattern. Firstly, I used the diamonds I already had. They are *weird* diamonds, somewhere between 45° and 60° diamonds, so the dimensions of my Jelly Parfait are NOT the same as the pattern.
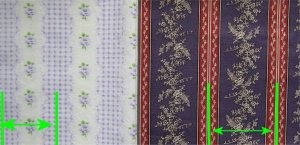 I used a printed linear ribbon stripe fabric for the sashing between rows. I had saved this absolutely, terminally cute gingham "embroidered" ribbon print fabric for "something" and the sashing between the Jelly Parfait rows was exactly the right circumstance!
I also changed up the border treatment. I determined that with the addition of a 5" wide border, I could have a queen size quilt. I wanted to use up as much of the gingham ribbon stripe as I could, so I decided to use it as part of the border (as well as for the sashing). Alone, it wouldn't have been wide enough. Fortunately, I had *another* printed purple ribbon stripe in my stash that I had been saving. However, the combination of the gingham stripe and the purple ribbon stripe *still* wouldn't be 5"
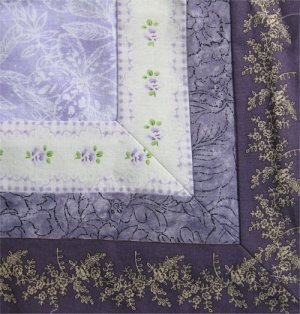 Again, fortunately, one of my quilting buddies had traded me some purple Jinny Beyer yardage and it was a pefect companion for the two ribbon stripes! I put the Jinny Beyer fabric between the two stripes to create the 5" wide border I wanted. I really like using stripes, either printed or sewn together, for borders since I can then miter the corners. Striped, mitered corners look sooooooooooooooooo pretty! :-)
Now that the top is complete and I finally *looked* at it, I can see that I used a very dark fabric for one of the setting triangles in the pieced triangles. Hmmm. Kinda looks out of place with all the others. Hmmmm. Too bad .. it's gonna stay. I don't feel like ripping out the sashing, the 6 setting triangles, re-cutting new ones and putting the replacements back into the quilt. Tough luck. Good thing this quilt is for me. :-)
It joins the others in the Pile of Tops to be Quilted (someday). :-)
Let's Fast Forward to 2012, shall we?
Once again, I had been having an Attack of the Guilts over the surplus of pieced tops I have that are waiting to be quilted. I had finished a queen-sized fundraiser quilt and could now start another pieced project OR I could start quilting the tops I had.
As much as I adore piecing tops, the tops that I already had really NEEDED to be quilted. To help me focus on the tops, I made a list of them. I like making lists. I can cross off the items when they get done AND I don't need to keep that information in my head. When the list was finished, I had 17 ... SEVENTEEN .... tops to be quilted.
Oh. My. Gosh. ::sigh::
I might add that Jelly Parfait is NOT on the list, so I suppose that there were actually 18 tops.
 In short order, I loaded Jelly Parfait on Lizzie.
I had my 108" unbleached muslin for the backing (I really like having the extra wide backing fabric ... no seams!).
One other feature of having a plain fabric for the backing is that you get a "whole cloth" effect on the reverse.
On the other hand, it does have its drawbacks ... any quilting inconsistencies show up.
If the backing was a print fabric, the print would hide the quilting. Just something else to think about.
I *think* the batting I used was bamboo. I'm not entirely sure because the batting was outside the packaging. Maybe it was; maybe it wasn't. I haven't a clue.
I used Signature thread for the quilting and Superior's Bottom Line in the bobbin.
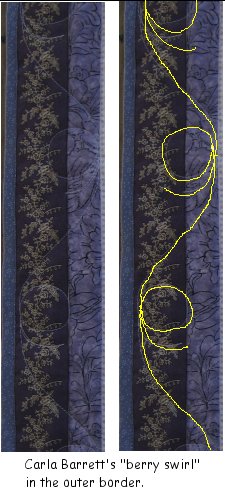 I used Carla Barrett's "Berry Swirl" for the border quilting. I just LOVE Carla's designs. She is so very generous to share diagrams of her designs.
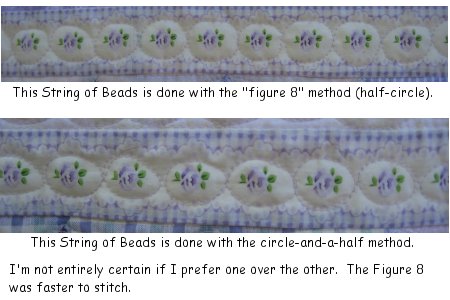 The gingham ribbon stripe got a String of Beads design. The real name is String of Pearls, which sounds so very elegant. And when you make all the circles the same size and shape, it LOOKS elegant. Sadly, my circles are not. Not circles and not the same size. Not so elegant but still pretty. Ergo, String of Beads. :-)
There are two ways to make the beads: a figure 8 (half circles) or a circle-and-a-half. I know I should have stuck with just one technique on this quilt (for continuity), but I didn't .. I used both of them for comparison purposes. The figure 8 is faster but might be more difficult to get a nice looking circle. The circle-and-a-half (so called because in order for the design to be continuous, you need to back-track over half of the circle so you are in position to do the next bead) might give more nicely formed circles but they do take longer to quilt.
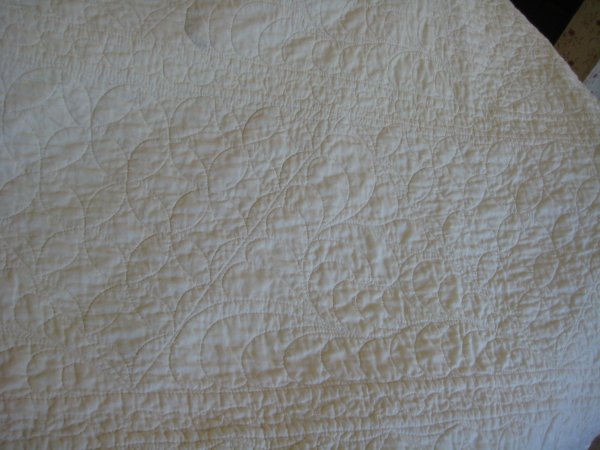
 There was no question that I was going to do continuous curves in the pieced triangles. I really like the optical illusion of interlocking circles.
Once again, Carla Barrett has provided a wonderful pathway diagram that allows you to stitch any and all continuous curves in ONE PATH. It's awesome. I love it.
(Don't be fooled by the feather diagrams at the top of the page (they are great, too); the continuous curve diagram is about 1/4 the way down the page.)
I also use an improvised template to help me make those consistent curves. Deloa Jones' has a ruler, Appliqlide, which is designed to allow you to easily outline around appliques. It really works too! BUT .. by chance, I discovered that the OUTSIDE curves of the Appliqlide are perfect for stitching curves in squares and diamonds. I use the end opposite the hopping foot cutout for smaller curves and the curve on the sides of the ruler give me longer, gentler curves. My continuous curves look very, very nice when I use the Appliglide as a template. Prior to this discovery, I was stitching the curves free motion and they just never looked very good.
 I also like feathers. There are SO many feather designs to choose from. I have a lot of books and inspirational photos/pictures to help me decide what kind of feather to stitch. However, sometimes having too many choices can be just as paralyzing as not having enough. :-(
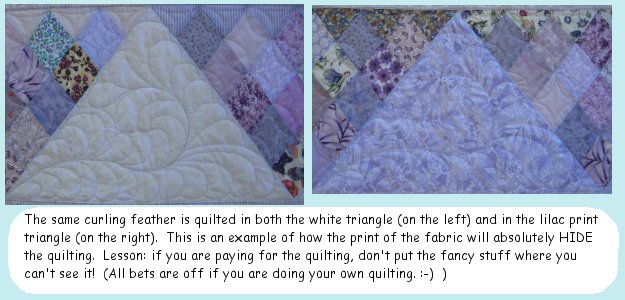
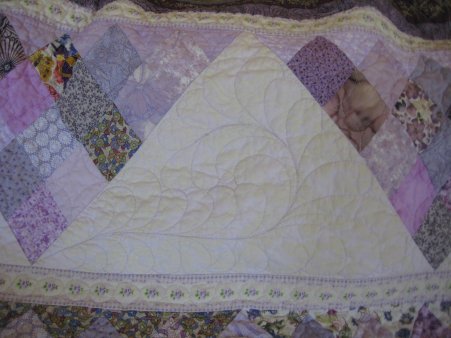
Eventually, I chose one large, curling feather for the solid fabric triangles. I knew that the lilac print fabric would tend to hide the feathers .. which is why it's not a great idea to do fancy stitching on prints ... but I didn't want to think of another design. Besides, this is my quilt; I'm not paying money for the quilting :-) so I can do
whatever I doggone want! And I want feathers. :-)
I have this nifty elapsed time timer that allows me to keep track of the time I spend quilting. It works just great .. when I remember to start it. :-) I can't tell you how many times I've found myself substantially into a row or border and realized that I hadn't started the timer! For Jelly Parfait, the time shows 9 hours quilting time. That is a conservative estimate. With the times that I forgot to start the timer, I figure that a more accurate time would be 10 to 10-1/2 hours.
 When I'm quilting, I love the way the quilting looks on the frame. It's so crisp and defined. But I know that quilts are going to be laundered and when the quilt is laundered, it's going to shrink. Even if you pre-shrink the fabric (which I always do) and pre-shrink the batting (which I have done in the past; it's a real PITA), there is going to be SOME shrinkage. The quilting is never going to look as good as when it's on the frame.
So, it was with some trepidation that I tossed the quilt in the washer, then the dryer. I was pleasantly surprised to see that the feathers STILL looked pretty doggone good!