Nabi Garden
a variation
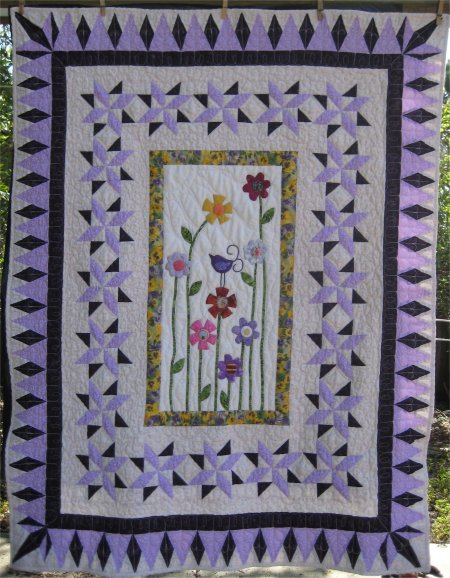
size: 44" x 56"
In November 2009, I finally finished my middle daughter's high school graduation quilt. From the many, many Snowball blocks made for that quilt, I had many, many bonus half-square triangle blocks. [How? Read here.] There were just SO MANY of them and they were such a good size that I couldn't simply throw them away. A quilt needed to be created to use them.
When you only have a basic block ... and other than a plain square of fabric, you can't get much more basic than a half-square triangle ... you are unlimited in what you can do. Therein lies my problem: there are TOO many possibilities to choose from. It's actually better to have a limited palette of choices so as to not overload my one remaining brain cell. I began to look at quilts made from half-square triangles. Google search with images is an invaluable tool ... I urge y'all to use it. :-)
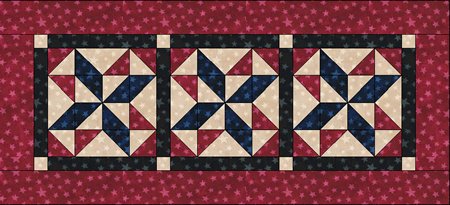 From one of my searches, I came across a Moda Marbles Stars Tablerunner, created by the Fat Quarter Shop. (a link to the PDF is on the tablerunner page) While the tablerunner is a nice pattern, it was the star made entirely from half-square triangles that caught my eye! After all, I had TONS of half-square triangles to use up! Using this pattern as a guide, I created my half-square triangle star block (Electric quilt drawing to the right). They kinda look like pinwheel stars.
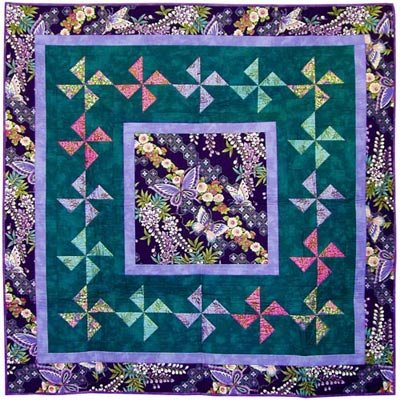 Now that I had all these half-square triangle blocks, what could I do with them? Another internet search turned up Nabi Garden, a pattern created by Nancy Mahoney for Kona Bay Fabrics. (the link is to the PDF) The Nabi Garden pattern has an inner border of pieced blocks ... it was easy enough to substitute my half-square triangle blocks for those in the pattern.
Furthermore, I had waaaay more half-square triangle blocks than Nabi Garden called for. This was a good thing, since I don't particularly care for square quilts ... they just aren't useful as a human quilt, since most humans are not square shaped. ;-) I simply used as many half-square triangle blocks as I needed to create a useful sized rectangular throw.
 While the pattern uses a focus fabric as the center medallion, I didn't HAVE a focus fabric. I didn't WANT a focus fabric. Therefore, I needed something to "stick in the middle".
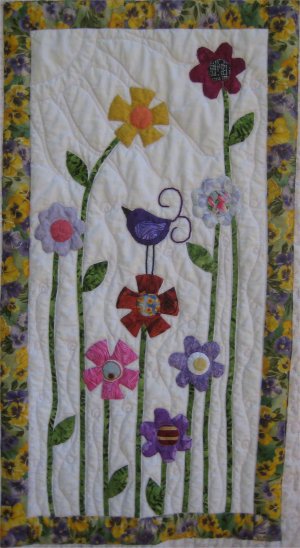
One quilting blog that I follow is Don't Look Now!. Kellie Wulfsohn is the author and designer of Don't Look Now! and is absolutely, tremendously talented. Her designs are whimsical, happy and cheerful; I simply LOVE them. :-) One of her freely available tutorials is a delightful pillow, Flower Garden. (the picture to the left is her pillow.)
I don't need another throw pillow right now but the Flower Garden design looked to be perfect as the center medallion for Nabi Garden. It turned out that due to the narrower width of Nabi Garden's center medallion, I could only put a few flowers in. In accord with my new love affair of hand applique, I needleturned the flowers and the bird. The flower stems are bias bands, also hand appliqued.
So, that left the outer border. Nabi Garden's pattern uses the same focus fabric for the border as is used for the center medallion. Seeing as I didn't use a focus fabric, I needed something else for the border. I certainly could have used a "slab o' border" but that is so predictable and common place. Although it is true that many of my quilts do have a "slab o' border" construction, this quilt really called for something different. I am currently enthused about swag borders and tried that thought out ... but it just wasn't working with the rest of the quilt.
|
It just so happened that Project House 360 has a Block of the Month that I am following, Land of Liberty. On the 15th of every month, a new block is provided for free download. (If you happen to miss it, it is still available for a small fee.) January 2010's block was a pieced border ... how fortuitous! With the proper color changes, this pattern turned out to be PERFECT for Nabi Garden! I used the freezer paper-piecing technique I learned from a Judy Mathieson class. (That link will lead you to a tutorial I have available.) |
So, now I had the entire quilt planned out. Execution was straightforward, although, as with every good project, I did learn ... or was made aware of ... new areas to be conscious of. For example, that outer pieced border .... I wasn't thinking far enough ahead. In my mind's eye, I was envisioning the binding to come right up to the points of the border. The template allowed the standard 1/4" seam allowance at the outer edge.
Unfortunately, MY bindings tend to be slightly larger than 1/4". To compensate, I'd need to remember to cut my bindings slightly narrower. Did I? No. OR I could sew the binding to the front side (as most quilters normally do) so I could make sure that the points weren't clipped off. Did I? No.
You see, I like to sew my bindings to the back of the quilt then flip it over to the front, where I top-stitch it down. I know that if I do bindings in this manner, the bindings will be very, very secure ... but this also means that my bindings do end up a bit larger than 1/4". Normally, this is not a problem. It *was* a problem with this border. This wasn't readily apparent UNTIL I started to top-stitch the binding on the front. By then, it was "too late" .. in that I was not going to rip out all that binding. Yeah, I'm just that lazy.
As a result, sad to say, is that some of the points are clipped. ::sigh:: BUT ... my own standard of quality for 'every day' quilts is .... if it looks good from the back of a galloping horse at a distance of 5 miles, then it's good enough. :-) That's my story and I'm stickin' to it. :-)
That leads us to the quilting; I recently took an online "Quilt Whispering" class by Carla Barrett, at Machine Quilters Resource. Using that knowledge, I took a digital picture of the quilt and printed it out, full size, onto paper. That paper was put into a clear plastic report holder (the kind that have a ridgid spine, which is slid onto the report and kids use to turn in school reports)(a clear plastic page protector would work just as nicely). With dry erase markers, I could then draw quilting possibilities on the plastic easily. If I don't like the result, it's very easy to simply erase it with a tissue. Much, much easier than pencil and eraser. :-)
Once I had a useable design, I loaded the quilt onto my Tin Lizzie. For this quilt, 'railroaded' the quilt, which is to say, it was loaded sideways. Why? Well, the longest dimension was lengthwise; the longest seams were lengthwise ... and it's always nice to have the longest seams parallel to the rollers on a longarm machine. The only thing the quilter needs to remember is if the quilting design is directional ... you gotta remember the quilt is sideways!
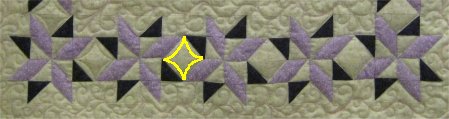
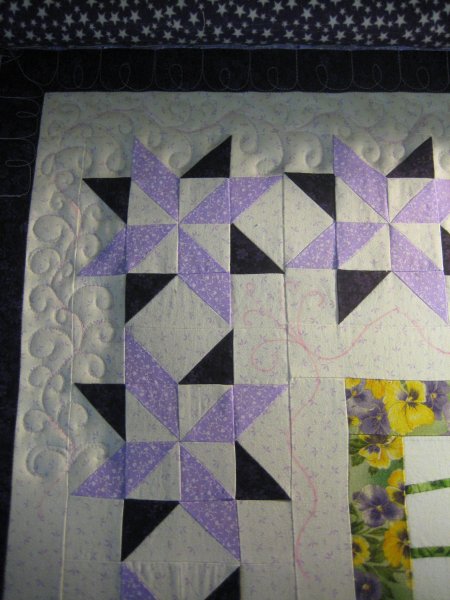 Here you see the upper left corner of the inner border (where the half-square triangle blocks are), as the quilting was being done. You can see the spine of the feathers that I chalked in as a guideline. I still need that sort of help in my freemotion work since my eye isn't good enough to wing it entirely. As I looked at what was done, I realized that the quilting was "pushing down" the batting, which in turn, made the unquilted areas "poof up". This, of course, is normal but I had never seen it so apparent on one of my quilts before. And I really liked the effect.
It was at this point, where I was about to quilt the half-square triangle blocks, that I realized my Quilt Whispered design was not appropriate for the pinwheel star: the design really was too dense. It looked OK on paper but when I looked at the actual pieced block, it just wasn't going to work. Dense quilting makes for a stiff quilt and I didn't want that.
This called for on-the-spot problem solving. After staring at the pinwheel stars for a while and realizing that I really did like the poofy look, it occured to me that if I simply did a stitch-in-the-ditch around the pinwheel stars, then the purple parts of the star very well could poof up, as compared to the spiral feathers beside them. With all the straight edges to be stitched, I sure did get a LOT of practice with ruler work and stitch-in-the-ditch! To be sure, some places are better than others and some places are really, really good! I am becoming much more confident in my ability to use Lizzie in this manner.
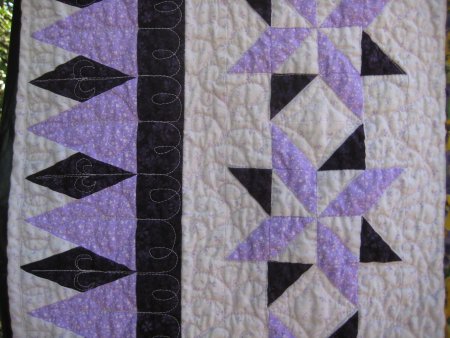 On the left is the quilting that I ended up doing in that area (picture was taken after the quilt was laundered, hence the wrinkling) and below is the quilting path.
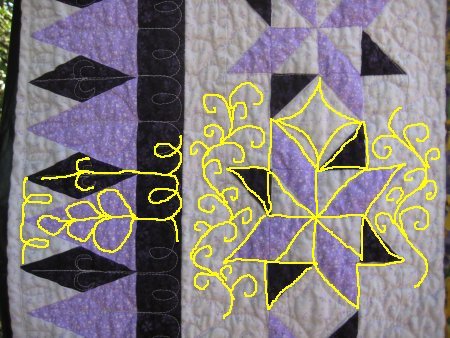
 As for the quilting in the center medallion, I was really in a quandry as what to do. From Kellie Wulfsohn's blogs, I know that she has her students stipple around the appliques. But I didn't want that sort of stiffness. Because I didn't know what to do at the Quilt Whispering stage, now was the time that decisions needed to be made. Sad to say, it was 'sit and stare' time again. BUT ... oh my ... I thought of something nifty!
Recently, a quilting buddy of mine, Linda in Phoenix, AZ, completed a
I didn't put any quilting in the floral border around the center medallion. One, any quilting in that fabric would be lost and two, I wanted it to puff up a little bit.
Once the quilting was completed with Lizzie and all the thread tails were buried, I made my bias bindings and bound the quilt. At that point, I hung it on my design wall to admire. As I sat opposite it, feeling rather self-satisfied about the entire process, to my utter horror, my eyeballs spied some UNQUILTED areas. It was the diamond areas between the pinwheel stars. Oh. My. Goodness. How ANNOYING. Really ANNOYING.
When I started these blocks at the top, I had figured out how to do the stitch-in-the-ditch along the top in one pass along with the Orange Peel curve in the diamond areas, then the stitch-in-the-ditch around the interior in another pass and finally the last stitch-in-the-ditch along the bottom. When I finished quilting all the available areas in the workspace, it was time for me to quit for the evening. I advanced the quilt in preparation for the next day.
Well, the "next day" actually turned out to be a couple of days later. I plunged right back into quilting ... advance the quilt ... quilt some more. Finally, I was at the end of the quilt and I was done! But, in those intervening days, I had forgotten my quilting path around the pinwheel stars and completely FORGOT to do the Orange Peel quilting. It isn't difficult at all to re-load a quilted quilt; in fact, in some ways, it's easier because you only have one layer to deal with. The ANNOYING part was that now I couldn't do the Orange Peel curves as part of the continuous stitch-in-the-ditch. AAAARRRRGGGHHHH! THAT meant that I had all those tails to bury. AAARRRGGGHHH. Geez, Louise, what a doofus.
And, as usual, I had my work scrutinized by one of the resident Quality Control Inspectors. :-)
One item of note: I used Hobb's Tuscany wool batting. This was a leftover piece from a larger quilt. There are very specific care instructions for wool batting:
 The backing is white flannel, extended to sufficient width by a column of dark purple with with white stars flannel.
The measurements of this quilt before laundering were 44" wide by 56" long. After laundering (and I scrupulously followed the above directions), the measurements were 42" wide by 53" long. Shrinkage was 4.5% widthwise and 5.3% lengthwise.
