A Hand-Stitched. Hand-Appliqued Forever Project
from the Diggin's, Colombia, CA

size: 80"x84"

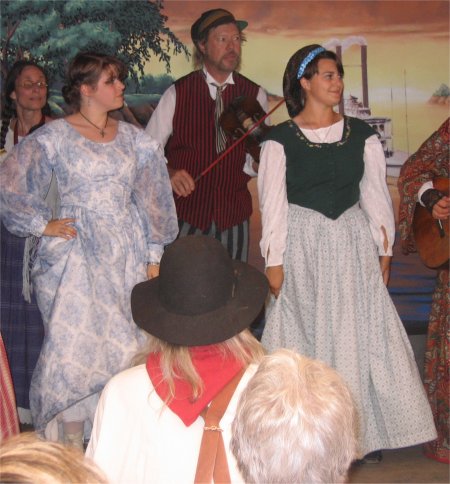
Every year during the first weekend in June, a Gold Rush era shindig is re-enacted and the south end of town ... a real as they can get it to a gold mining camp of 1852. The buildings are historically accurate, the clothing worn is historically accurate, the food, the activities, the businesses, the people. Why 1852? Well, that's real simple. In reality, it's women who love this dress-up stuff and the men just go along with it cuz life is easier for them if they do. [grin] If want to have women other than the 'soiled doves' in town, they needed to be at least at 1852, since that is when they have historical records of other women being in town.
The Diggin's (as it was called [or even 'Tent Town']) started way back in 19xx by Maria Fuller and Kelly, two incredibly energetic ladies who simply love to perform in this historic setting. Over the years, as they got more funds and more people, they were able to put up more authentic buildings and populate the buildings with more authentic re-enactors. And over the years, EVERYTHING became more gnat's eyelash accurate as of 1852 than the previous year.
From that small foot in the door, every year thereafter, Rene became a little more involved. She started hanging around with more people, making herself known. Particularly, she became friends with Maria, who's alter-ego is Southern Comfort, one of the wonderful barroom floozies :-) (and her name? well, honey-bunch, her name is Comfort ..she's from the South ... she's Southern Comfort! :-) ) Because Rene was underage, Tom & I needed to be onsite with her for supervision, etc, etc. This wasn't really a problem because we liked hanging around the Diggin's and the town itself.
One year, Maria arranged for Rene to be supervised by the 'madame', Madame Arabella, [grin] who was just the loveliest person you'd ever want to meet in real life, so that Tom & I didn't need to be in the Diggin's for the entire weekend.
 And as Rene grew up and became more and more interested in this re-enactment venture, I made her more historically accurate outfits .... one that she could wear up on the stage at Cazneau's Theater (as one of the junior barroom floozies) yet modest enough for *me*. (After all, this is *my* daughter who is wearing it!) The outfits were altered as the years went by and Rene's sister, Lisa, got momentarily caught up with Gold Fever. :-)
 Tom's part was a natural ... he got to play in mud looking for gold and then retiring to the local saloon when he didn't find any. By 1852, "regular" women were more prevalent in town and exerting a more stabilizing influence upon it. My persona was more conventional ... I decided I would be a single lady, en route to San Francisco, to join my husband who was setting up a business. To pass the time at the Diggin's, I needed to be doing something. What did women do? They quilted!
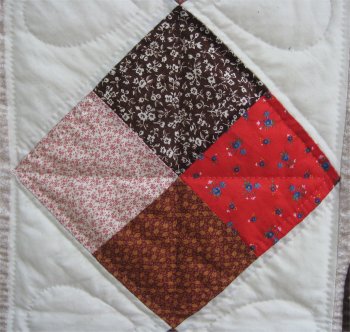
Although hand-crank sewing machines *were* used, most women still sewed by hand. And so, my Diggin's Forever Project was born. I needed to have a historic layout ... columns of 4-patches on point alternating with plain fabric columns fit the bill perfect. While at home, I prepared my supplies ... rotary cut squares of red and brown calico, triangles of muslin. A wooden sewing basket with appropriate supplies was assembled: thimble, thread, needles, pins, small scissors.
Whilst Rene galivanted all over the Diggin's, doing her junior barroom floozie stuff :-), *I* sat in the shade and hand-stitched 4 patches together. It turned out that hand-piecing 4-patch units was incredibly easy and over the years (yes, *years*), I accumulated quite a few. Each 4 patch was paired with 2 muslin setting triangles. The resulting diagonal rows where then stitched together into columns.
Remember, the Diggin's is only ONE weekend a year. And I started in 2005. Just exactly how many 4 patches and triangles and columns do you think I completed, when I was only stitching for a few hours for 2 days?? Not too many. When we returned from the Diggin's, all of our outfits *and* my sewing supplies went into storage until the next year. Honestly, I really had no desire to actually MAKE a hand-stitched quilt but I needed a historically accurate "something" to work on. If the Diggin's Forever Project never got finished, that was all right by me. I certainly had enough OTHER projects at home to work on, which could be machine pieced!
As I was cleaning out the storage shed where we kept our Diggin's outfits, I re-discovered the quilt. I realized that it could very well languish there forever unless I made a concerted effort to work on it. As it turned out, I had just finished a Forever Project and was in need of another one. (Forever Projects are handwork that I take with me to appointments, road trips or any place that I think I'm going to be bored to tears. It gives me something constructive to do and helps pass the time more quickly.)
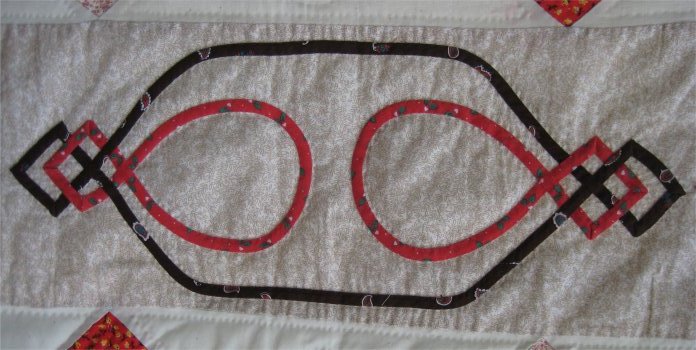
 Since the Diggin's quilt didn't need to remain 1852 authentic, I was free to embellish the plain fabric columns. I love Celtic knotwork and so I looked over my Celtic design books and chose a simple one to do in the two colors, red and brown. I didn't want to transfer the Celtic design onto the background fabric for *every* design (simply because I am very lazy that way) so I made a design "template" of the knotwork on paper. In this manner, I would be able to curve the bias tubing into the knotwork design with some semblance of uniformity. I pinned the bias tubing onto the paper design and steamed the life out of it. When it cooled, I removed it from the paper template and put it onto the background fabric to be hand-appliqued.
 Unfortunately, because the design is open, it is very "floppy" and as a result, quite a few of them look rather lop-sided. And the spacing on the columns wasn't exactly the same BUT, that's the way they got stitched and that's the way they are going to remain! I just consider that part of the "charm" of an entirely hand-pieced work that was done piece-meal over many years without the benefit of a Grand Plan being thought out beforehand. :-)
You can clearly see how lop-sided and non-symmetrical these designs are in the above picture. I didn't want to draw the design on every single stinkin' place I wanted to put it, so I just kinda plopped the bias tubing down, urged the tubing to work with me and manuevered the whole thing into a reasonable design shape. Obviously, I really could have done a LOT better, but ya know? it just was *not* that important to me. This was the Diggin's quilt .. it was a quilt designed to consume time when I needed to simply have my body at a certain place. It wasn't a quilt that I had any great desire to make.
In 2009, I was coming to the last of the last! The end of the tunnel was in sight and it was full steam ahead! I took the Diggin's quilt with me while we went on our annual camping vacation ... and FINISHED IT.
Oh. My. Goodness. I don't think I can stand it. :-)
This top goes into the pile to be quilted at a Future Date ... I have other tops that get precedence. I'm also shelving it because I'm not at all sure how it should be quilted. The entire quilt is hand pieced and hand appliqued. It seems to me that the "proper" thing to do would be to hand quilt it. BUT ... I am not at all interested in hand quilting anything this big. My last hand quilted quilt (a lot smaller) took me 27 years. :-)
While I don't at all begrudge the cost of hiring someone to hand quilt it for me, I also just can't quite get myself to layout that kind of money. I can certainly machine quilt it and it would get done rather quickly ... but it wouldn't machine quilting look a little "harsh" and seem disrespectful to the hand stitching?? On the other hand, no one can SEE that it's hand quilted and certainly machine pieced and hand appliqued tops get machine quilted all the time. So, I don't know what to do. In the mean time, it will sit, waiting it's turn for a spot in the sun. :-)
 In early 2010, I packed my Diggin's quilt off to my quilting buddy. Eventually, it was put in the frame and hand-quilted. In the Fall of 2010, my Diggin's quilt was returned to me, along with the ladybug quilts for me to do. (In the meantime, we had also agreed that I would do another ladybug quilt for her, but as a commissioned piece.)
The hand-quilters did a very fine line of stitching around every edge of the Celtic knotwork design.
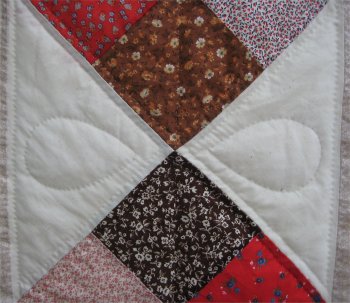
 The setting triangles got a pointed loop, reminiscent of the loops in the Celtic knotwork.
 And the 4-patches were outline stitched and bisected by vertical and horizontal lines.
 By the time I finished binding the quilt in December 2010, I was trying to do an embroidered name label (in addition to my standard documentation label) for my quilts. For this quilt's label, I did a Celtic knotwork in red and brown, to coordinate with the front of the quilt. The machine embroidery is a free design, available from Thredworks. The alphabet used came from a site that is no longer in existance.
Because the embroidered label is large, I was concerned that it would "puff" up when the quilt was laundered. To help eliminate this possibility, I hand stitched a (nearly invisible) outline stitch around outside of the embroidery and around the lettering. This wasn't a *quilting* stitch, as the stitch did not go through all layers; rather, I deliberately did this running stitch so that it only went through the label, backing and batting. I mostly definitely did not want any of these stitches to show up on the front!
I am EXCEEDINGLY pleased that this quilt is finally done! Without trading of our respective abilities, I know this quilt would still be a top. I am very appreciative of the hand-quilting that was done for me.
The quilting was done by the Putnam City Christian Church quilters of Oklahoma City, OK.