Schizophrenic Buzz Saw


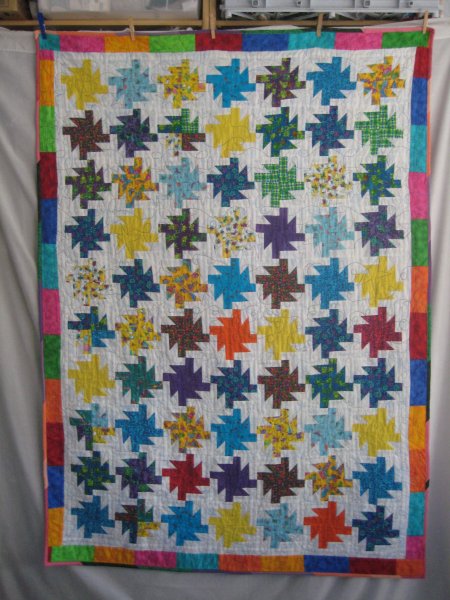
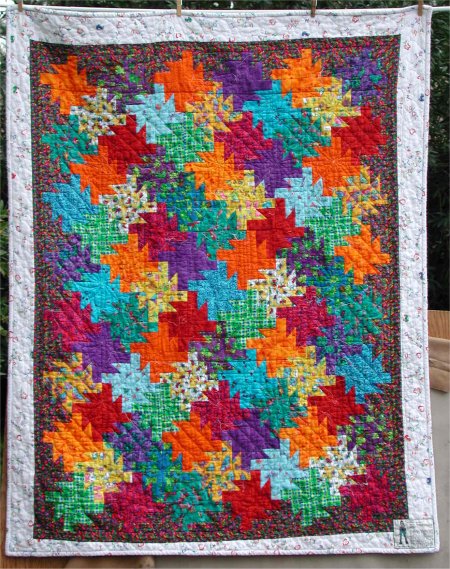
 This quilt started out so nicely. I had LOT of flannel strips leftover from a previous project (Joy Sargent's baby quilt ... picture at left). I liked the Buzz Saw block I had used in that project, so I decided to make more of the blocks but this time using a background flannel to define the blocks rather than tesselate the Buzz Saw portion. The flannel is that wonderful, lovely velvet sort of flannel that is thick and cuddly and warm.
I wanted to put a border around it but was stymied as to exactly what. I didn't want a pieced border, as I thought that might compete with the incredibly busy interior. I didn't want a one color border. And then .. and then .... I was wandering around one of my local quilt stores and I chanced upon this *marvelous* multi-color blocked velvety flannel! It was made to order!
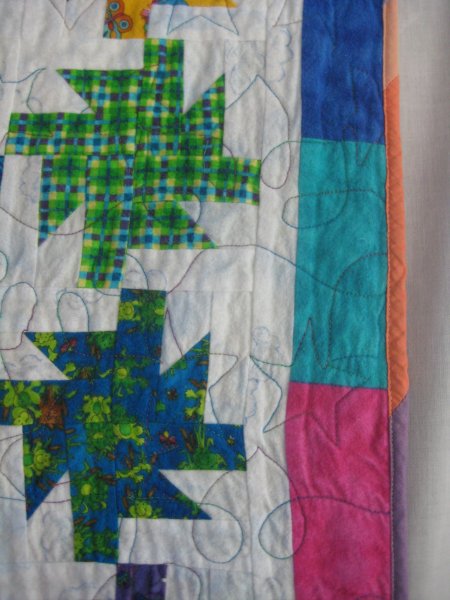
The fabric (of which I don't have any sizeable pieces to show you) is printed in lengthwise columns of "color bricks". Each brick is a different, vibrant color, which just happen to coordinate beautifully with the colors of the Buzz Saw blocks. I could see that if I cut the fabric along the column lines, I would have a border strip! However, as the size of each brick was too wide for a border for this quilt, so I just cut each column in half, lengthwise ... as a result, each printed column yielded *two* borders for me. The most awesome thing was that, although the border LOOKS pieced, it is just a single length of fabric! No seams to negotiate!
For the binding, I used bias made from a multi-colored strip set from yet another project. Although the colors in this diagonally banded binding weren't the same saturated colors as the quilt and border, it still worked well.
The top really did turn out wonderful.
Then it got put away because the next step was to quilt it.
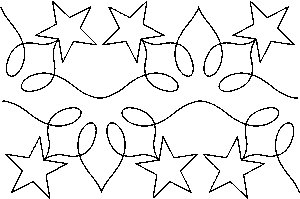
 By 2008, I had re-started my quilting efforts with my longarm quilting machine and this top rose to the top of the list. With this top, I decided to try a pantograph, "My Stars", designed by Hari Walner. I remembered that I should try the simple quilting designs first and this one LOOKED simple enough ... loops and outlined stars. This turned out to be SO not the case.
Tracing a pantograph isn't as easy as it looks! You can think of longarm quilting machine head as being on a gyroscope ... this allows the head to be omnidirectional. And therein lies the problem ... it will go *anywhere*.
It's not quite frictionless, so there is a certain amount of "drag" that you need to overcome in order to move it. Trying to smoothly trace the pantograph *precisely* while overcoming the drag is a skill you need to master. Many times the pantograph design is busy enough so that if you stray from the lines, it isn't terribly noticeable. The loops in this design are forgiving in that respect. However, the stars are a different matter ... no sooner do you start on the straight lines then you must slow down and briefly pause at the tips before beginning the next line. The pause is necessary so that you don't get gawdawful tension loops on the backside, helps you to make sharp points (instead of rounded ones). That starting/stopping for the stars AND remaining on the design lines so that the stitched design actually LOOKS like a star is a real challenge.
Another problem can arise when you move over bulky seam intersections; passing over them isn't smooth. The head of the machine wants to move to the line of least resistance, which isn't where the design line needs to be. As a result, the stitched lines will be .. well ... "wonky" is the kindest term I can think of. :-)
My first pass along the top of the quilt looked like I was either drunk or that a 3 year old had done it. My goodness, it was bad. Taking a deep breath, I attempted the return trip (this pantograph has 2 rows on it, so you can do a return row back to where you started). Return trips are always interesting because the muscle movements that you used on the first path are mirror-imaged on the return trip. When I finished the return pass, it was more awful than the first attempt. I was pretty annoyed.
BUT ... remembering that this was a practice quilt, I did another swipe of the design. I was trying hard to stay on the pantograph line, smoothly slowing down on the star points and trying not to be tense. "Relax. Breathe. Relax. Breathe." At the end of the second pass, the stitched design was truly awful. Worse than awful. It was horrible.
So, I'm thinking that just maybe, pantographs aren't going to be my "thing". Perhaps I could give it a whirl from the front of the machine and do the design free motion. I tried that and was just disgusted with that effort. I cast a baleful look at the quilt and walked away. I abandoned it to sit in its pathetic state for a couple of days while I returned to my sewing studio to do something (anything!) that I knew I was good at. I needed an ego boost. :-)
After that couple of days, I returned to Lizzie and the quilt. I had a couple of choices: continue with the pantograph; rip OUT all that I had done (on flannel yet!) and re-do it; or something else. Continuing with the pantograph wasn't too appealing; the design was giving me negative vibes. Ripping out *all those stitches* was a chore too onerous to contemplate. The "something else" was really the only viable alternative for this lazy quilter! So for the second half of the quilt, I did a free motion loopy meander that *did* turn out nicely!
This poor quilt is now schizophrenic ... one half of the quilt is a truly awful quilt design; the other half of the quilt is actually quite pleasant to look at. But even with the awful quilting, it's still a useful, warm quilt. Lisa (my middle daughter) has claimed it and has pronounced it "wonderful" (she obviously didn't notice the quilting!).
 I have one picture to illustrate the multi-colored border, the bias binding .... and the pantograph quilting. I obviously tried to pick out the best of what I had done, so it doesn't look as terrible as I have been describing. Hmmmm ... that picture doesn't look half bad, does it? :-)