Teahouse Garden

size: 48"x68"
Let me preface this project by saying I have plenty of UFOs to work on. I have plenty of tops that need quilting. I have plenty of projects for which I already have fabric and/or patterns and/or both. And yet, when I discovered the (free) pattern for this quilt at Electric Quilt (in conjunction with RJR Fabrics), I promptly downloaded it.
I know that if you don't a) buy fabric when you see it or b) get freebies when they are available, they tend to vanish with time. Missed opportunities with fabric I can deal with, as I have more fabric in my stash than I will ever possibly use. However, I know I will regret not downloading a pattern, since I can always find fabric to use with it regardless of what fabrics are shown on the cover picture. [update 2012: apparently the pattern is no longer available on either Electric Quilt or Do You EQ? or on RJR's site. I think my point is made]
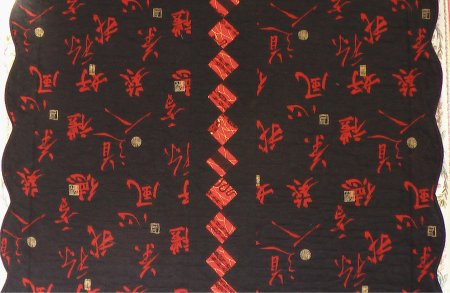
As I was combing through my stash, looking for something (which I can't quite remember at this point), I came across a very small collection of Asian fabrics. Now, I love Asian fabrics, but I don't have a lot of them. That is probably a good thing as I know it could easily overpower my entire stash. I figured I could make Teahouse Garden out of this small collection and accomplish several things:
Since that quilt, I obtained a nifty little specialty foot, Curve Master. I had my doubts, but after mastering the technique necessary to successfully use this foot, I discovered that it really does work wonderfully and speeds up piecing time. So, although I know that I don't absolutely require it, I use it because it makes quilting life simpler. I used the Curve Master foot to piece every single Drunkard's Path unit and they all came out lovely. [Note: I did square up the finished Drunkard's Path unit to ensure it was completely square before I joined the units into blocks.]
I began choosing which fabrics would be the smaller Drunkard's Path and which ones would be used for the larger. I kept on cutting until I used up all of my Asian fabric collection.
Then I started laying out the blocks: 4 of the smaller Drunkard's Path are used to create a full circle block; 2 of the larger Drunkard's Path are used to create a half-circle block. The full circle and half-circle are then fitted together Tetris-style to produce the size quilt you want. I made mine substantially larger than the pattern calls for.
I find myself disliking smaller quilts (wall hangings, miniatures, etc) since I really don't have any use for that size. This quilt ended up being a nice throw size at 48"x68". This pattern is so versatile in that respect ... you just keep adding on blocks until it's the size you want.
I discovered that both fat quarters and 1/4-yard strips work equally as well at yielding several Drunkard Path units.
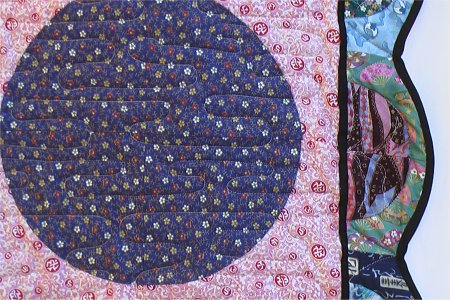
 When I was finished with (what turned out to be) the center section, I had a LOT of smaller Drunkard Path units left. Not wanting to put the already constructed units into my scrap box, I thought about it for a while and realized that I had enough to make a border with them.
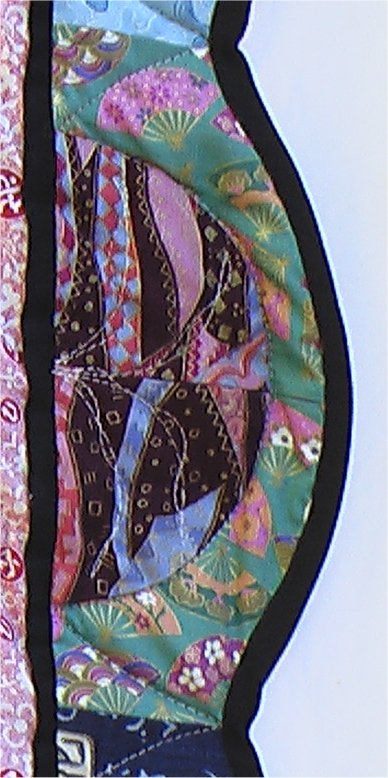
However, simply putting more Drunkard's Path blocks around the center looked very muddled. A flap of stark black sewn onto the center section, which shows up between the center portion and the border, gave me the definition and separation that I needed.
Furthermore, it occured to me that I could follow the curve of the Drunkard's Path to make a scalloped border! Unfortunately, this made the quilt wider than my backing BUT, never letting a lack of fabric get in my way, I simply inserted a strip of black-and-red on-point 4-patches down the center of the backing fabric. Due to a brain fart, I miscalculated the size I needed for the 4-patches to be to result in a sufficiently wide backing and I ended up with EXACTLY the width of the quilt before the scallops were done (about 50" wide).
To quilt on a longarm machine, you need *extra* backing all the way around to attach the leaders to, in order to secure the quilt for quilting. After smacking myself upside the head, I had a work-around: I could just sew on some temporary muslin strips to create the extra width necessary so I could then use my longarm quilting machine, a Tin Lizzie 18.
A stark black bias binding completed the quilt and repeated the color of the flap.
 I've been having major panic attacks about using my Lizzie. I had an electrical problem (not Lizzie's fault, but rather the brownouts here in California), then I got distracted with garment sewing and by the time I returned to Lizzie, it had been 2 years since I last took a class. I was MAJORLY insecure about working on it.
But, I reviewed my notes and documentation, loaded Lizzie with Teahouse Garden and proceeded to quilt the center section in (what I thought was) a water ripple pattern. [I later discovered the actual name is "water stipple" and contains some curly-Qs that I hadn't remembered .. oh well .. next time.] For my very first real quilt, I'm pleased with the outcome.
I also wanted to do a stitch in the ditch along the black flap to secure it. I know that a stitch in the ditch is not easy with quilting machines, since the heads move every which way. You need to use rulers as a straight-edge to guide the machine head in a straight line ... this means you have one hand on the ruler to steady it and one hand on the machine head to guide it.
This requires way more skill that I currently possess, so I opted to do the stitch in the ditch on my home sewing machine. Since it was along the border strip, I could easily fit that portion of the quilt in the throat area of my sewing machine. I also did a curved stitch in the ditch along the outside of the Drunkard's Path border blocks for security and definition. THEN I finished the scalloped binding.
 It was after I finsihed the binding that I realized the border was just a little too poofy and floppy ... more quilting was needed. So back to my home sewing machine and did squiggle quilting lines inside each Drunkard's Path. To complete the quilt, a label was stitched to the back.
Stick a fork in it cuz this one is DONE! I'm not quite sure how to react to locating a pattern, pulling the fabric, piecing it, quilting it and FINISHING it all in one month. It seems so bizarre. Aren't you SUPPOSED to wait years between piecing and quilting? ;-)
Don't talk to me about all the UFOs and potential projects still waiting for me. La la la la la la la ... I'm not listening to you! :-)