AH! Real Monsters!
Fall/Winter 2007

(top only)(still in progress a/o 3/08)
OH NO! Help me! I'm appliqueing! :-)
Point 1: I have previously talked about naming a mystery applique method on at About.com's Quilting forum . No one could come up with an existing technique that was *exactly* that process (some came real close, though), so I'm calling it "Nancy Lee Chong's Basted Applique", as it was her directions where I learned it to make the "Peace" wall-hanging. I continue to be astonished at how EASY this method is for applique. That was 8/30/07. Remember that date cuz it will amuse you.
Point 2: I finished my Forever Project #2 (the hand pieced Cathedral Window) and needed a new Forever Project. Since learning NLC's Basted Applique technique, I decided that I would now tackle a Monster applique quilt. Literally monsters. I had bought the pattern years ago at a quilt show just because it was so doggone cute *eventhough* I knew in my heart-of-hearts that I was never, ever going to make it. But since the completion of the project in Point 1, an ever-so-faint hope sprang to life that a new Forever Project was about to emerge ... and so I began my next Forever Project ... so I thought.
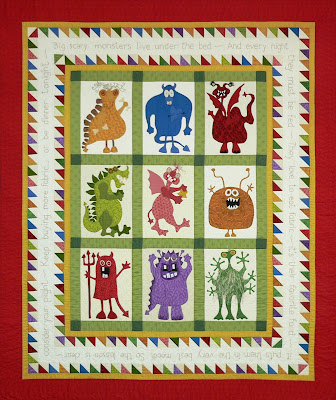 Point 3: The Monster applique quilt by Susan H. Garman (buy the pattern here, picture at left). It has 9 ginormous, wonderful monsters. Each monster is appliqued onto an 18"x20" background block. Yeah ..... the quilt is going to be HUGE. I prepared my Forever Project box with the supplies for my first monster and during my weekly visits with my Dad, I would work on it. The work done during one visit turned out to be substantial. I was astonished. And while the intent of my Forever Projects is something for me to do while I am away from home, when I got back home, I couldn't resist working on my monster just a little bit more. He was just so doggone cute! As a result, my first monster was finished in 3 days. [stunned silence]
So, I prepared supplies for my next monster. Well, not wanting to drag out this story, let me just say that working on my monsters has been addicting. I have cheated, as I have worked on them while I was home, as well as when I visited with my Dad.
As a result, as of this date (10/28/07), I have completely finished 7 monsters and am almost done with monster #8.
Remember the date I asked about the applique method? Well, this is just 2 months later! Obviously, they just don't make Forever Projects like they used to. :-)
I have monster-themed fabric tucked away to use with these blocks, but as the fabric was bought LONG before I started this project, I'm going to need to be creative in how I use it. I'm sure that I don't have a whole lot of it.
 By mid-November 2007, I had finished all 9 monster blocks and began working on the setting.
I've mentioned before, but will repeat here, that I don't particularly care for grid layouts when I can think of something more interesting to look at.
I've always liked the Garden Maze setting (picture on the right) and used these directions to construct the connecting blocks. The segments between the connecting blocks are simply strip sets.
BUT, never let it be said that I left something simple when a more complex, confusing version could be used! Since I had a bunch of coordinating fat quarters, I decided to use those fat quarter fabrics as the strip next to the monster block and the outer strip would be of my black-background monster print fabric. This made for some pretty tricky color selections in the connector blocks!
Furthermore, I decided make it appear as those all the Monster blocks contained by the Garden Maze lattice, would "float" inside another monster print fabric used as the outer border.
The Monster pattern comes with a delightful poem that is embroidered (or lettered) around the perimeter of the quilt. Since I had segments created by the Garden Maze lattice, I decided to hand embroider the poem in those perimeter segments. I also decided to hand embroider the monsters' names in the segments below each monster (this was not suggested by the pattern but something that I wanted to do).
While I think using one's own handwriting for labels is important for posterity and historical reasons, I don't quite hold that opinion for the front of the quilt! I want the lettering to look uniform, legible and *pretty*! I knew that my free-form hand writing wouldn't fit any of those criteria. So, I used my word processor to create patterns that I could trace onto the fabric ... I used Lucinda Handwriting in font size ginormous (whatever the largest size is). I broke up the perimeter poem so that I had equal parts in all the outer segents. Then I simply put the printouts under the fabric, traced the lettering onto the fabric and embroidered over the pencil marks.
At this date, 3/28/08, I am still embroidering. All the monster blocks have been done ... all of the adorable monsters are identified. The outer poem is about 2/3rds done. Eventhough I do like hand embroidering, for whatever reason, the embroidery is taking longer than the applique! Go figure!
OH!!! Here is something that I discovered that made the hand embroidery so much easier! Usually for letting, a stem/outline stitch is used because it's a beautiful skinny stitch that accomodates curves. Unfortunately, my stem/outline is the pits. I've never quite mastered the technique to make it look beautiful. But I knew that particular stitch was the best one to use. I was discouraged.
However, enter the "whipped backstitch" stitch. Ohmygoodness! Talk about a cheater stitch! I love it! (All pirates love cheating.) It makes any ordinary nincompoop (like me) look as though they are Embroiders to the Queen! First you do a standard backstitch along the design line. Then using the same thread (or a new, contrasting color), return over the backstitch and whip the thread around the stitches without catching any of the base fabric. The result is EXACTLY like a finely stitched stem/outline but without all the hassle. :-) It's my new, most favorite stitch. :-)
Here are my darling Monsters. Some of the monsters have a modest amount of hand embroidery for definition and embellishment.
 Mr. Bones,
 Mr. Big Heart,
 The Green Machine,
 Harry Vetch :-)
A word of explanation concerning "Harry Vetch" .... the monster's proper name is Harry Monster but at the time I was working on the applique, Mr. Pirate had received in the mail a cover crop for our "North 40". The cover crop is "Hairy Vetch" .. no lie! ... and I couldn't resist a little bit of poetic license. :-) ,
 Star Catcher,
 Big Red,
 Mr. Big Mouth.
No pictures as yet: Madam Dragon, Mr. Chompers.
I just LOVE this quilt. It makes me smile every time I look at it. And since this is my first substantial applique quilt, I'm KEEPING it. :-) As to the name of the quilt ... these monsters remind me of the ones in "Monsters, Inc.", the cartoon movie by Pixar (a delightful, charming movie, by the way) and also of the monsters in Nickelodeon's "AHHH! Real Monsters!" (another wonderfully entertaining cartoon).
When completed, this top will join the other unquilted tops, to await its turn to be quilted.