The Together Quilt
(or Quilting the Golden Gate Bridge)
Date made: March 2006
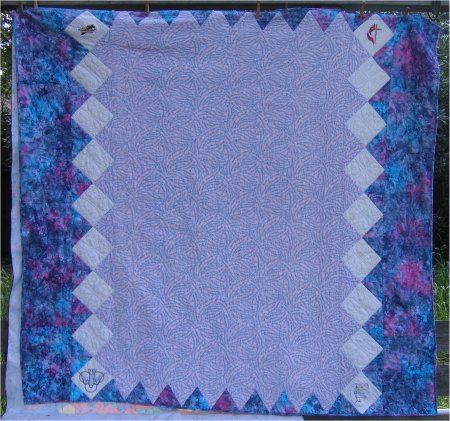
This quilt was made for a married couple friend of mine (that's a very weird construct, isn't it?). It was a quilt of opportunity in that this quilt had not been on my List of Things To Do, patiently waiting its turn; I was in a fabric store and came across the focus fabric (Northcutt's "Quilt for the Cure") that so perfectly fit this couple. Knowing that if you don't buy fabric when you see it, if frequently become unavailable, I bought about 2 yards worth. I was thinking on my feet about a very simple layout that would showcase the focus print and be easy to do. I also wanted this quilt to be able to be used by the both of them together (hence the "together quilt" name) so the quilt would need to be wider than normal for a throw. In thinking about a layout, I decided that I would simply use the focus fabric, full-width as-is, and extend the width with some sort of borders.
Since the focus fabric had a very pink background and pink isn't very macho, I wanted to de-feminize the quilt to a certain degree. To accomplish this, I used a blue batik with touches of pink in it as side borders and put off-white Fairy Frost squares-on-point between the focus fabric and the borders.
The "simple and easy" concept kinda got away from me, as I started putting in the squares-on-point. I realized that to make them be a nice transition from the central focus fabric to the batik border, I would need to be careful about what fabric I used for the setting triangles. Then, because I didn't want to have a different binding fabric for the central section than for the sides, I needed to have the batik fabric on the tops and bottoms. To make THAT idea seem as though it was part of A PLAN, I decided to put a sawtooth border on the top & bottom of the quilt to tie in with the squares-on-point detail. Somehow, my "simple and easy" concept was becoming complicated.


In the 4 corner Fairy Frost squares, I machine embroidered different religious designs to coordinate with the focus fabric text. The Cross & Crown, Cross & Flame and the Holy Spirit designs came from Ann the Gran, in the Religious link. The JOY (Jesus, Others, Yourself) is the logo from JOY Designs, available in the Free Designs links.


 With the top pieced, the next step was sandwiching and quilting. This time, I actually remembered to mark the quilting pattern on the pieced top BEFORE I sandwiched it. It certainly is easier penciling a design on fabric without batting underneath. :-) I decided I wanted an all-over quilting design for the center section ... something "simply and easy" to do ... do you see a pattern here? Everything was supposed to be "simple and easy" so that I could get this quilt done fairly rapidly. Well, you know what "They" say about the best laid plans of mice and men. [sigh] I knew I didn't want to do meandering .. BTDT .. I wanted something either different or something I hadn't done in a while. I did have a stencil for Baptist Fan quilting design that though it would be appropriate.
Had you wondered about the sub-title, "Quilting the Golden Gate Bridge"? Wonder no more ... remember that the center section of the quilt is full width of fabric, about 44". It's also 2 yards long, 72". That's one honkin' big expanse to quilt with an all-over design.
I don't have a long-arm quilting machine. I don't even have a short-arm quilting machine. I have what every other seamstress has .. a domestic/home machine. And working with even this small quilt is like wrestling an alligator.
I'd quilt a little, get up, read my email, clean the kitchen a bit, return to quilting. Repeat, repeat, repeat. I got so desperate that I ALMOST considered cleaning the bathrooms. Rest assured, it never got quite that bad. BUT, there was just *so much area* to quilt, it seems as though I would never get done.
Fortunately, I did remember there was a "trick" to doing the Baptist fan quilting to make it easier and less stops/starts. Eventually, eventually, the center section got quilting.
I then did a small Happy Dance. :-)
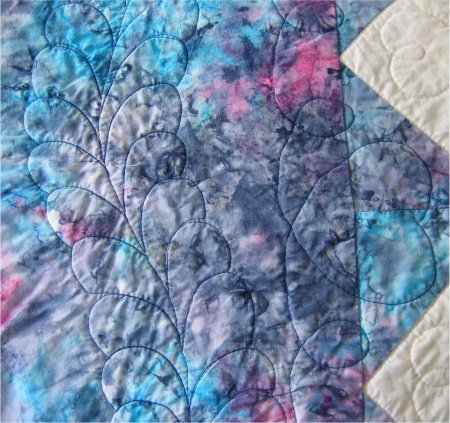 That left only the borders to quilt. I put four hearts in the squares-on-point and a hearts and loops & a wandering feather design in the border itself.

Then came the binding. Now, I've been binding quilts for a Long, Long time. I even have a nifty webpage on how to make yards and yards of continuous bias for binding, complete with charts on how much fabric you'll need to make the length binding required. I measured the perimeter of this quilt. I had exactly 12 selvage inches left (44" wide by 12" long). This amount was NOT going to give me the amount of bias I needed if I use my normal width of bias. See .. when I was thinking on my feet, I hadn't known how wide I would like or need my borders to be, so the yardage I got for the batiks was kind of a guess. Too bad I guessed short. BUT .. I thought if I made my bias very narrow (well, narrower than I normally do), I just might be able to squeak out what I needed to go around the quilt. So, I made the bias binding, sewed it around the quilt .... only to come up 10" short. Drats, drats, drats. Double drats.
The next morning, I made the drive to the shop where I bought the batik. This is very small store, off the beaten path and I know she doesn't move her fabric very fast. I was crossing my fingers that she would still have the batik on the shelf. And Fate must have been smiling on me because IT WAS THERE!. Oh, hallelujah! Happy, happy day! I bought 1/2 yard more (more than enough for my shortfall .. the excess was a stashbuilder. :-) ).
The quilt is now finished. I even have a label on it! Time to package it up, hold my breath while the Postal Service has it in its possession and hope it gets delivered without mishap.