Frosting the Sewing Room
Date made: June 2004
One project that I am SO glad that I finally completed is the window treatment in my sewing room.
My sewing room is about 200 square feet with 8 windows (6 single hung windows and 2 stationary ones).. it gets LOTS of natural light. Since the windows face south and west, the glare of the afternoon sun can be tremendous. I had always wanted to do some sort of window treatment but dithered and procrastinated because I couldn't decide what color(s), what design, what *anything*. I had bought a book on making pieced Roman Shades, but couldn't decide what exactly to do, so I continued to procrastinate.
It was recently when I had some quilting friends over on a nice sunny day that the glare became unbearable and I realized that I really, *really*, REALLY had to make something. But not the pieced Roman shades ... that would require a concentrated effort. :-)
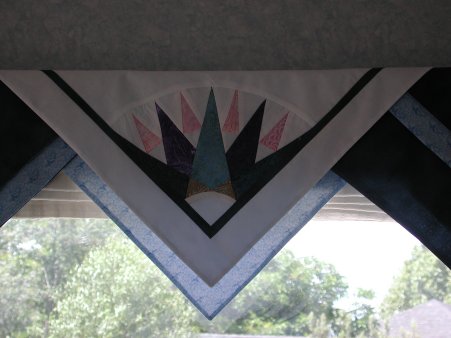
What I did find was a Simplicity home dec pattern (0694) for valances that look rather like prairie points (were you wondering how I was going to tie this back into quilting?) ... or a handkerchief hem. The samples on the envelope front just used fabric "as is", although they did center the floral motif on one sample. Now, *I* can't leave well enough alone .. I can't use simple fabric! *I* have to do something *more*! What I decided to do was to make a 1/4 Mariner's Compass and put it on-point so it would fit into the prairie point effect.
The window treatment is really very, very easy, although it looks rather complicated. Each "prairie point" is a square of fabric, fully lined. Fold the square in half, diagonally, but off-set the points so there is a small amount of the backing fabric showing. It looks as though there is a border around the top layer. The square is then simply placed over a curtain rod so that the backing fabric shows beyond the edge/hem of the upper layer.
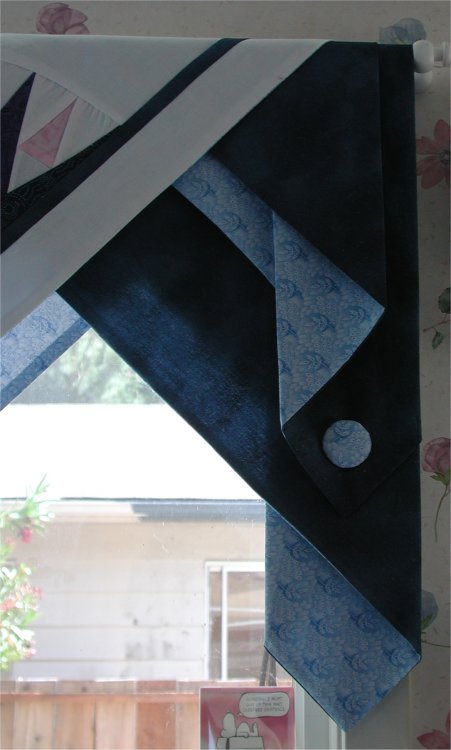 The end units are also a square of fully-lined fabric, but folded in 3 sections so that when it is folded over the curtain rod, it looks like intricate layering. The best part is that NOTHING is sewn down. Each section is separate from the others and all of them are simply laying on the curtain rod.
These valances cover both roll-up window shades and traditional Roman shades that I made from fabric I already had on-hand (although it had been previously earmarked for other windows .. these windows got precedence. Well ... kinda/sorta. The fabric had been purchased .. umm.... 20 years ago [hangs head in shame] but never quite got made into the shades for the other windows. I figured that if the other windows hadn't put up a fuss in 20 years, maybe they were content to be the way they are. :-) ).
The fabric for the valances were part stash, part new-bought. The dark blue mottled fabric had been purchased as a background for a BOM quilt (that I haven't started yet!). However, upon reflection, I decided that the BOM background needed to be *really* dark and this particular one wouldn't do ... so I felt good about using it for the window treatments. The white fabric is simple bleached muslin, which I already had. The scraps for the Mariner's Compass points came from my scrap pile(s) and were chosen to compliment the colors in the wallpaper. The light blue print fabric was newly purchased.
One "accessory" for the curtains was the addition of big (1.5" - 2") covered buttons to accent the end pieces. I was dumbfounded to find the cost of ONE button form that big was $1.25. I needed 10 buttons. There was NO WAY I was going to pay $12.50 for 10 buttons ... that were just a decorative accent! However, I did like the look, so I thought of a low-cost substitution: I cut out a circle from sturdy cardboard, put a piece of batting over it, covered it with a circle of fabric and then drew up the fabric circle like a yo-yo. I am very pleased to tell you that it looks *exactly* like a covered button .. and the cost was far less than $1.25 a piece!
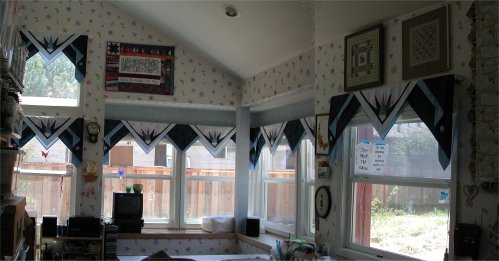
This is a panoramic of the windows in my sewing room with the 7 windows that got dressed up. (The remaining window is up at the roofline on the opposite wall and doesn't get a fabric treatment.) [yes, I did tidy up my sewing room prior to taking the picture. Yes, I am that vain that I don't want everyone to see how my sewing room *really* is. :-) ]
I am *so* pleased the window project is finally, finally done! To control the glare now, I can either pull down the roll-up shades (a darker room) or let the transluscent Roman shades down if I want more "light" but no glare. I am also pleased to report that using those yards and yards of inappropriate background fabric and the yards and yards and yards of "aged" Roman shade fabric has freed up a substantial amount of space in the boxes where they had been stored. Slowly, slowly, I am working on my UFOs .. of which this had been one. :-)