Over the Edge
Date made: January 2004


Another project hits the dust! woo hoo!
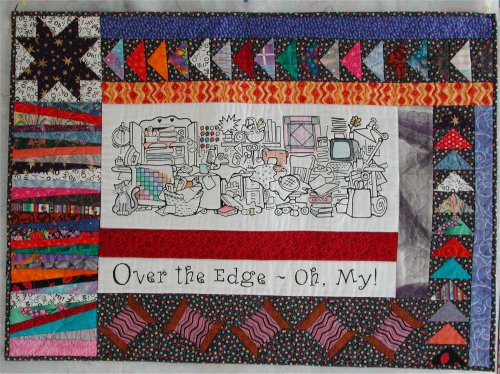
At this year's Pacific International Quilt show in Santa Clara, CA, I bought a kit called "Over the Edge" which included a FQ of original hand-printed fabric. The hand-printed fabric had 3 elements: a line drawing of a completely disorganized and cluttered sewing room, a title strip and a background strip of exclamatory words. The sample at the booth was delightful and I realized this would be a great scrap fabric project (not that it would make a huge dent in diminishing my scraps, but I wouldn't need to buy any new fabric to make it!).
Since I have recently completed other UFOs, I was hot to trot, so to speak. :-) Using the color photo as an example of what colors to put where (why mess with success concerning color placement when it has already been done for you?), I pulled similar colors and/or designs from my stash. I was very pleased to find that it was an extremely easy wall-hanging to put together. The directions call for partial coloring of the line drawing w/ fabric markers .... I wasn't about to go out and buy a whole bunch .. but experimentation with my Zig scrapbooking markers (which are permanent, acid-free and non-water-based) showed that they can successfully withstand the washer & dryer .. so those are the markers I used to color in the line drawing. [note added later: I should have realized that objects viewed from a distance need to have more vibrant color to be seen than objects seen up-close. I didn't color the line drawing very darkly, so the colors appear as though they are pastels. I should have colored them more firmly so the color would have been darker. More intense colors would have shown up better when viewed from across the room.]
 My own rendition of the wall-hanging is slightly different from the kit's ... I have an extra vertical sashing on the right hand side. You'll see a series of topsy-turvy spools of thread at the bottom of the wall-hanging. Somehow, I managed to make the spools of thread larger than they should have been, resulting in a longer strip than the pattern calls for. To compensate, I added the extra vertical sashing. [shrug] eh .. I wasn't about to remake all those spools of thread.
 The vertical band of lop-sided fabric strips on the left hand side represents the bolts of fabric in our sewing rooms. :-)
 Then it came time for the actual quilting. I am truly dismal at coming up with novel ideas for quilting motifs; I tend to "stay in the box" and this wall hanging was no exception. I stippled in the black background areas and the background behind the purple star. I outlined stitched many objects in the line drawing .. you can't see the quilting cuz it's black just like the lines, but it does give a slightly dimensional feel to the center of the quilt. I found some continuous line hearts, both vertical and horizontal, that I sized to fit the various sashing bands. (I did the resizing by computer: I scanned in the quilting motif, edited it in my graphics editor to the different sizes that I needed. I was quite pleased at how (relatively) painless this was.). The 'fabric bolt' band was quilting in a continuous line vine motif. I used Superior's Glitter thread for decorative stitching and Aurofil for the stippling. The finished size is 2' x 3'.
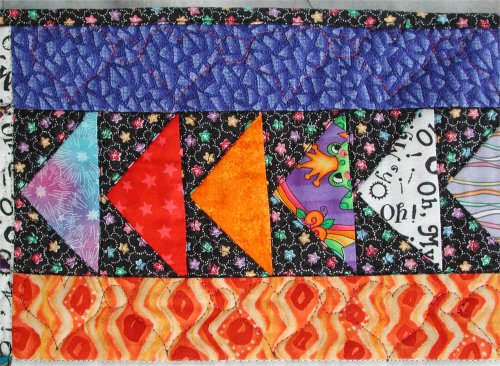
Cautionary tale:This wall-hanging has been positioned on a *north-facing* wall that never EVER EVER gets ANY sunlight. Ever. There's natural daylight in the room, of course, but sunlight NEVER hits this wall where the wall-hanging is.
So it was with considerable surprise that I realized, at some point, the black print fabric ... which just looked so wonderful ... has faded. Quite a bit, in fact. Look at this sad picture and compare it to the one at the top of the page:

What can I learn from this?