Organizing your Stash
into books

pictures & explanation by Shelley Rodgers, Walnut Creek, CA

Email: pirate_sr@hotmail.com

© January 2007

You have lots and lots of yardage in your possession. It's piled high everywhere. You know you have the PERFECT piece for your current project but you can't find it. You are discouraged. To make yourself feel better, you go fabric shopping.

And repeat the cycle.

The solution to this problem is ... ORGANIZATION! Remember what your mother told you: "A place for everything and everything in its place"? Can you imagine how wonderful quilting would be if you could simply go to the stash and select what you needed? Well, if you spend some time now to organize your stash, it will make your future quilting life so much simpler. This is definitely the example where an ounce of prevention is worth a pound of cure!

This is how I organize my fabric ... mostly quilting stuff, but some non-quilting occasionally sneaks its way in.
1. Here you have your yardage straight off the bolt; the selvages are at the top of this photo and the fold is at the bottom. This particular piece is about 30" long (or slightly more than 3/4 yard).
2. Bring the folded edge up to the selvage edges. This will result in an 11" high by however long your yardage is. At this point, you can clean-cut the right-hand side if you want so there isn't a raggedly edge to deal with later.

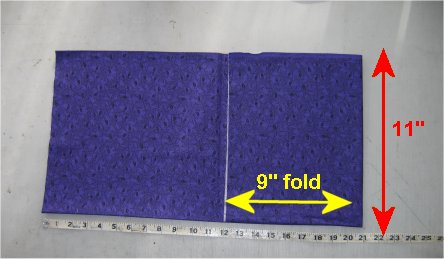
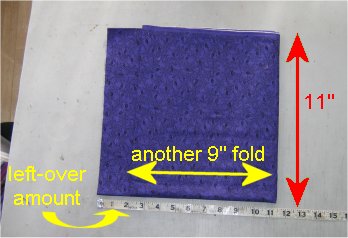
Once you have your 11" high yardage, make a mark (with your finger? a pin? a ruler? whatever) 9" from the right side. Fold towards the left on that mark. An alternative folding method was suggested by Barbara7885 and Becky/RabidQuilter of About.com's Quilting forum: simplify the folding by using a folding template! Cut a stiff piece of cardboard 9" by (at least) 13". One of the square acrylic rulers might also make a good folding template. Place the folding template on the extreme right-hand side of the fabric, aligning the bottom and right sides with the fabric. There will be a small piece of the template sticking out of the top. Pick up both the fabric and the folding template and flip them to the left. Continue flipping to the left until you've reached the end of the fabric. Using the excess height of the template as a grip, slide the template out from the book. The folding template will help you make very uniform books.

Although in a pinch, you could use the paper cores that bolts of fabric are wrapped around. I don't like to use them because they are "fat". They take up too much space when folding and leave a "hole" at the core of the book. Yes, the hole collapses when the book is put into your storage box, but it just upsets my sensibilities. :-) But if you have one and don't want to cut another template, it's a reasonable substitution.

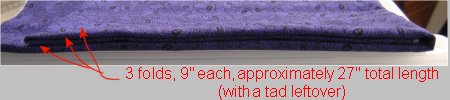
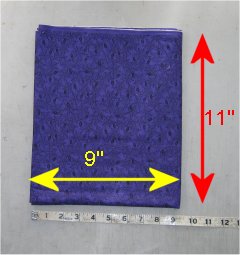
Why 9"? Well, 1/4 yard is 9". Therefore every fold you make henceforth will be 1/4 yard. Every 4 folds is 1 yard. It is a very easy (and approximate) way of estimating how much yardage is folded up. I don't worry about folding precisely at 9" because as you fold, the book becomes incrementally larger. If you have enough yardage to fold, your resultant book absolutely will not remain at 9" wide; it will be wider. BUT ... it's still a good estimate.

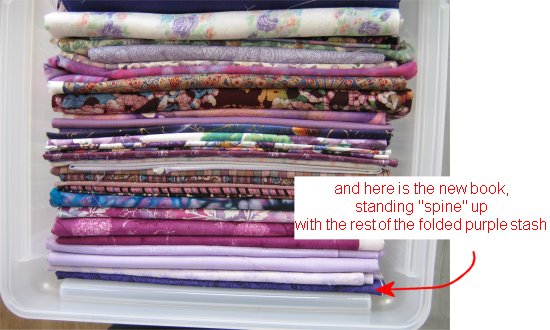
The key is to create UNIFORM books ... of whatever size best suits your needs.

3. In this step, I've folded my 3/4 yard piece twice .... it has 3 folds plus a little bit leftover on the extreme left-hand side. The leftover amount is unavoidable, so don't worry about it. I simply tuck the leftover amount inside the book and disregard it when it comes to estimating yardage.
4. This is a bird's-eye view of the bundle from the folded edge. I've drawn arrows to show the 3 folds ... each 9" long.
5. Here's the finished book. It's 11" high by 9" wide (more or less). All of your fabric books will be this uniform size. Having everything folded to a uniform size (of whatever dimensions you like, not just 9"x11") makes storing your fabric much more efficient and easy to get to.

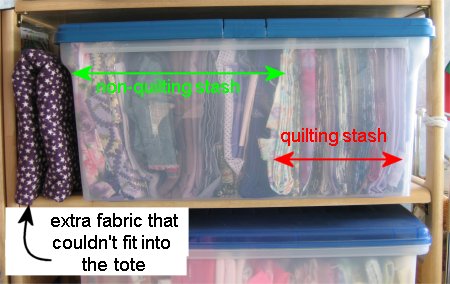
I've looked all over .... every store that carries storage containers for "just the right one". It had to fit my bookcase shelves. It had to be at least 9"x11" (preferably slightly larger) and no longer than 25", which is the length of my bookcase shelf. It needed to have a lid to keep out dust. It needed to be translucent so I could see what colors were inside.

Over time, I've found several that fit these requirements but the price kept me from buying all that I needed, so I'd buy one or two storage totes at a time. When I got more funds, I'd return to the store, only to usually find that they had DISCONTINUED that style or manufacturer. AARRRGGHHH! I hate it when that happens! As a result, I have several different styles of storage boxes, but they all have the above-mentioned characteristics.

6. Here is a bird's-eye view of the newly folded book in my purple stash tote. I put all my books "spine" up so that when I remove the lid of the box, I can scan across the spines to refresh my membory of exactly what's inside. Narrow spines mean a small amount of yardage; fat spines mean more yardage. It's easy enough to look at the narrow edge of the book to count the folds to determine more-or-less how much yardage there is. I suppose you could store the books folded edges up so you could very easily count, but my preference is to have the spines up because it gives a truer picture of what the fabric motif is.
7. Here is my purple stash storage box. As you can see, this box contains both quilting and non-quilting yardage. The non-quilting yardage isn't folded as neatly as the quilting fabric because some of the non-quilting fabric is more than 45" wide ... which results in a taller "book". This means that I have to fold the tall book to make it shorter so that it fits in the storage box. Non-quilting fabric scraps get tucked inside their respective book (which makes the non-quilting books a tad messy at times).

And then there's that purple and white star fabric on the shelf next to the storage box. Well, sometimes you just can't put everything you have into one storage box. If I have extra yardage (hopefully not too many pieces), I will simply stack them next to the storage box. That way they remain with others of the same color and I don't forget them.

Feedback, comments, etc can be sent to Shelley Rodgers at pirate_sr@hotmail.com.