9-patch Trucks
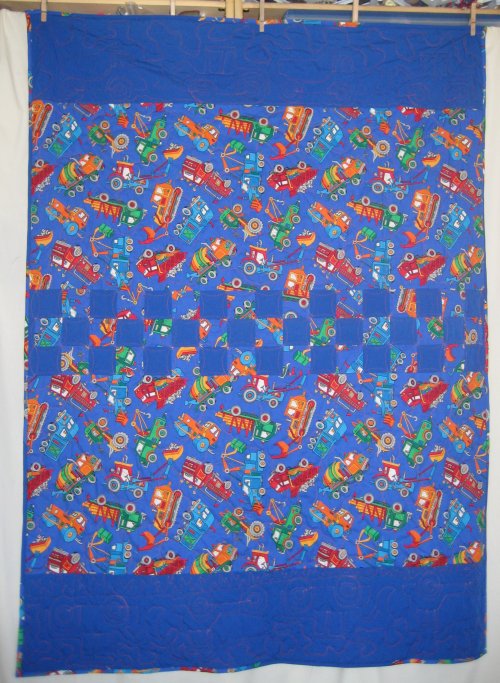
size: 44"x58"

This quilt certainly started out differently. It was originally intended to be the *back* of another charity quilt top. :-) The fabric came from my Freecycle donation but wasn't big enough on its own to be the backing, so I "stretched" it by adding the solid blue fabric as borders. To sort of integrate the two fabrics, I blended them together in a row of patches in the center.
Recently, I had gone through my pile of tops waiting to be quilted and did a search-and-rediscover mission to find my supply of backing fabrics. What I uncovered was a nice supply of fleece yardage, which I had purchased quite a while ago with the intent of using it *as* quilt backings. I like using fleece as backing because I don't need to use batting with it (we don't get sub-zero winters in California!), it's still warm enough since the fleece is acrylic *and* the quilt remains supple for draping after the quilting is done.
I paired a gold fleece with this blue truck fabric and suddenly the former backing became the top. :-)
I pin my backings and tops to my leaders. It's a method that works well for me. When using fleece for backings, I like to pin the selvage edge to the leaders because there is no stretch along the selvage, making it a very stable edge to pin. The cut/raw edge of the fleece, which is stretchy, is kept taut by my side tensioners.
In this particular case, the orientation of the quilt required that the cut/raw, stretchy edge be pinned so I would be able to have the solid blue border run horizontally (parallel to the rails). This would enable me to do the borders in a single pass This meant that I needed to pin the cut/raw edge of the fleece to the leaders. This really isn't a good idea since the cut/raw edge of the fleece is VERY stretchy ... not what you want when attaching it to the leader.
I did figure out a good solution though ... I needed to stabilize that cut edge. Something that wouldn't stretch. Something that I had on hand. Something that I had a lot of. Something that I wouldn't mind sacrificing. And what would that be?? Muslin! :-)
I cut 1-1/2" wide, straight of grain strips of muslin, the full width of fabric, sewing them end to end to get the length I needed. This long strip was ironed in half, lengthwise ... as though I was making binding. The cut/raw edge of the fleece was then inserted into the folded muslin strip to be "bound" by top stitching with a long basting stitch. It didn't need to be pretty; it wasn't part of the quilt. I just needed the woven muslin strip to be attached to the stretchy fleece to prevent the fleece from stretching.
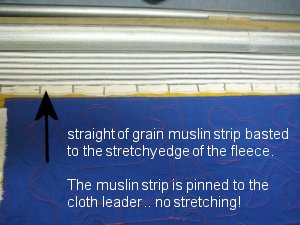 This "bound" edge was then pinned to my leaders. And, by golly, it worked wonderfully! If I wanted to .. or was so inclined to do so, I could remove all the basting stitches so I could re-use the muslin on the next fleece that needed it. On the other hand, the quilt needs to be squared up anyway and that edge will be waste .. so I could just toss it. Yes, I could be just that lazy. :-)
When it came time to do the quilting, I was faced with a *large* expanse of solid blue fabric. In keeping with my desire to use these charity quilts as a way to try new techniques, I wanted to do a pantograph in this blue area. I had the PERFECT pantograph ... a large dump truck and a back hoe. I was envisioning a line of them across the blue fabric. When I resized the panto to fit the height of the blue border, it turned out that I could *exactly* fit 4 motifs across the width.
I've done pantographs with my Lizzie before and it's awkward with my set-up. Because of the way I need to fit Lizzie in the room, I don't have any space at the back of Lizzie, so when I want to do a panto, I have to physically move the frame futher out in the room in order to have space behind Lizzie. I also have to physically move the control box from the front to the back, but that doesn't annoy me as much as having to muscle the frame around. As a result, I don't do too many pantographs.
On the Home Quilting Systems Yahoo group, there was a recent discussion on the possibility of doing pantographs from the front of the machine. Susan of MA simply pinned her motif onto the quilt near the belly bar and used the pantograph that way. Another person rigged up a shelf in the front, similar to the way the pantograph shelf is normally on a frame.
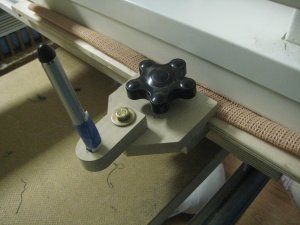 Intrigued, I thought I would try it. First order of business was how the heck to attach the laser light to Lizzie in the front? It wasn't designed to be done that way so there is no access point for attachment. My Lizzie is one of the original models (circa 2006). The laser light is attached to the carriage deck as shown by this picture. Yep, I was totally underwhelmed by this example of technology when I first saw it but later, I was to appreciate it. :-) Pride goeth before a fall, ya know. :-)
But dang .. I sure don't like to be thwarted by a problem! I called in Mr. Pirate and we brain-stormed for a solution. What we came up with was 100% Rube Goldberg, but ya know? it worked. :-) Even better, since we had all the components on hand, it was "free".
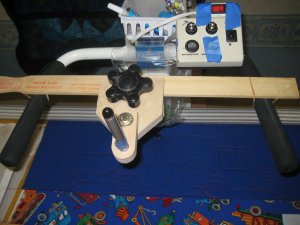 The laser light needed to be mounted in front of Lizzie. We thought of the flexible part of a gooseneck lamp, but that would entail figuring out some sort of clamp system to the handlebars and for the laser light itself. Then I remembered that I already *had* a clamp system .. the one that came with Lizzie! Using rubber bands, we attached a painter's stir stick (5 gallon, which is longer and thicker than the standard stir sticks) across Lizzie's handle bars. I simply unscrewed the clamp system from the carriage deck and clamped it onto the painter's stirring stick. Maybe it wasn't so clunky after all. :-) I offer my apologies. :-)
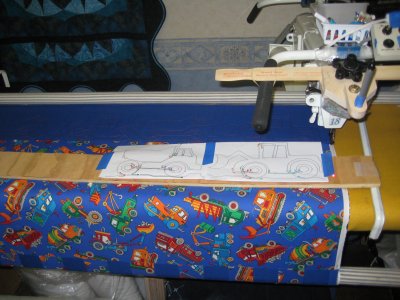
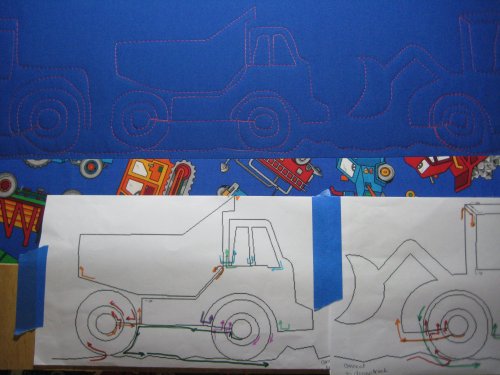 Version 1: the area to be quilted was positioned close up to the take-up rail so that there was plenty of quilt top near the belly bar.
I pinned the pantograph directly on the quilt top next to the belly bar.
There was more than enough room for the pantograph motif and the stitching area, although I would never be able to do multiple rows this way.
If you look closely on the pantograph, you'll see where I have drawn "directional arrows" for myself ... that lets me know where I need to steer Lizzie to produce the pantograph design. I didn't think about it at the time, but this design is complicated. It doesn't have the 'normal' loops and swoopiness of other pantograph designs. This one is definitely about points and angles and a distinct object!
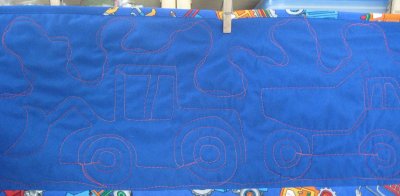 My first pass was a qualified success and I was really quite pleased with it. The system worked, as far as tracing the pantograph design with the laser light went. The quilted design was nicely level with seamline I had wanted to use as the "road bed" for the trucks.
The part that I wasn't too happy about was that Lizzie generates a certain amount of vibration when she stitches. This vibration causes the quilt to bounce up and down slightly. Since my pantograph was pinned to the quilt top, *it* was bouncing up and down also. I suppose that, depending on the exact nature of the design, this might not be too big of an annoyance, but for the design I was using, it was unacceptable. Designs of a free-form nature could be done with the panto pinned to the top, but my design was of trucks. I really wanted them to LOOK like trucks when I was done, not Pablo Picasso's version! :-) I needed a way to isolate the pantograph from the quilt top.
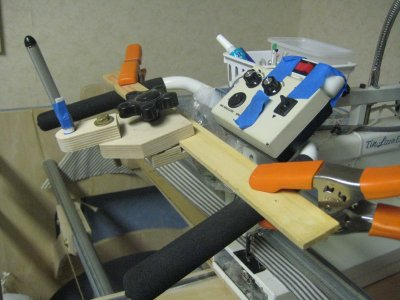 Another aspect the I wasn't happy with was that there was too much vibration being transferred to the laser light on the painter's stirring stick. The rubber bands allowed too much play.
This was easily remedied by replacing the rubber bands with some big, ol' heavy duty clamps ... these are honkin' big clamps (that I stole from Mr. Pirate's inventory. please note that Mr. Pirate required me to put that in) that require *me* to use both hands to open them. :-)
Once I had clamped the painter's stirring stick to Lizzie's handles, there was no way that stick was going to be bouncing around. :-)
Version 2: Isolating the pantograph from the quilt top. I was thinking that a shelf parallel to the rails would be good. But I didn't want to get too involved in the "manufacture" of the gizmo, just in case it didn't work out. The shelf needed to be suspended above the quilt top which meant that it would be resting on some sort of support structure that would be perpendicular to the rails. Furthermore, these supports could not be slipping around.
 Rooting around in our garage (and taking my life in my hands as I did so .. boy, that garage REALLY needs to be cleaned out!), I found 2 short curtain rods .. the kind that have 90° bends on the end so that the curtain rods extend away from the wall. These bends in the rod would 'hook' over the take-up rail and belly bar.
Next, the shelf itself. Because it was spanning the entire width of the quilt, there was the real possibility of it bending in the middle due to its own weight. So, I needed something that was long but not too heavy. Plexiglass would be great for weight, but it might sag too easily. Besides, I didn't have any. :-)
Then I spied (with my little eye) a narrow piece of 3/8" plywood. Yes, plywood is heavy, but this one was narrow .. about 8" AND it was just as long as my quilt was wide. Perfect .. for a trial.
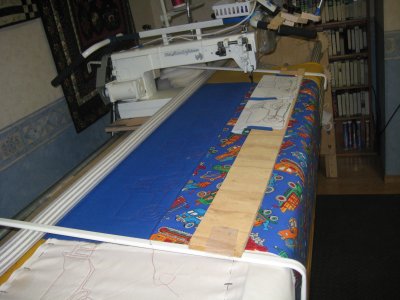 Next problem was how to secure the plywood shelf to the curtain rods so they would be a single unit. Strapping tape to the rescue!
Oh, look ... get real! .. it's just an experiment! It's not pretty; it's not elegant .. but I'm just trying to see if the system was even feasible! :-) So, I used copious amounts of strapping tape to adhere the plywood to the curtain rods. Boy, did this thing ever look funky. :-)
When I needed to quilt the pantograph on the remaining border, I got the pantograph aligned properly with the space in the border, taped the pantograph to the shelf and away I went. The honkin', big, ol' clamps held the laser light in place wonderfully. The pantograph didn't bounce all over during the quilting. I must say, I was mighty pleased with myself. :-) For such an inpromptu system, it was working well.
 Until ... ::ahem:: ... I looked at the actual quilting. Oh dear ... during the quilting process, the shelf unit had managed to slide away from its original position, so my poor trucks were traveling on an incline. Ooops. :-) Well, the lesson learned here is that for the NEXT time, I need to secure my shelf unit to the frame somehow so *it* remains in place during the quilting process.
All in all ... I'm happy with it. To be sure, it's not as easy as just plunking down a pantograh on the frame's shelf at the back, but then for *me* and my set up, that was always an annoying production. Weighing the pros and cons, it's half a dozen of one; six of another. Choose your poison. :-)
So, this quilt got quilted in short order ... the blue borders got their truck pantograph with the excess areas filled in with a ribbon meander. I chose the ribbon meander because it's a "light" filler; I didn't want dense quilting because I knew that what I had planned for the rest of the quilt wouldn't be dense either. You really want to try to evenly distribute the quilting density so your quilt will lay flat.
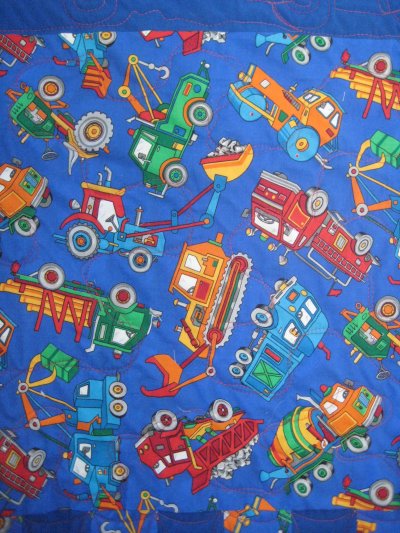 The next section was the truck print fabric. I knew that anything I did in there would get lost in the print, so I simply repeated the ribbon meander.
I'm really liking this ribbon meander ... a simple meander looks boring to me, although there are times when it is the appropriate design for an area. But by simply going back over the original meander to create the twisted ribbon look, makes the resultant meander look SO much more interesting for very little effort.
Look closely at the picture; the ribbon meander *is* there, but even with the contrasting red thread, you really can't see it too well due to the print.
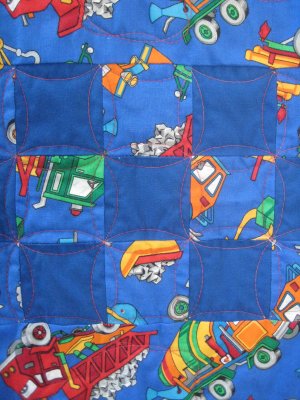 The patchwork section was quilted with continuous curves. I *like* doing continuous curves in patchwork areas. Once I had the proper templates to use, it's not difficult to do. Yes, it does take longer than any free motion quilting .. but any template/ruler work does. In the end, I just like the way it looks.
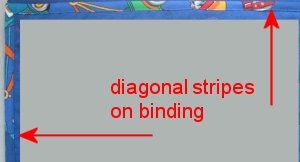
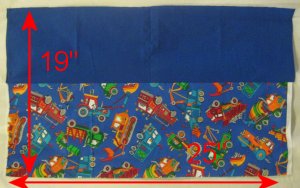 Finally, the binding. I had exactly two pieces of the blue solid and the truck print leftover. Each piece was about 10"x25". I knew from my calculations, that if I sewed them together in a strip set and made my bias from that, I would get more than enough bias to go around the quilt. The beauty of this is that not only do I have fabric that EXACTLY matches the top but I also will have a delightfully diagonally striped binding to give one last piece of interest to the quilt.
