Unnamed Blue and Apricot
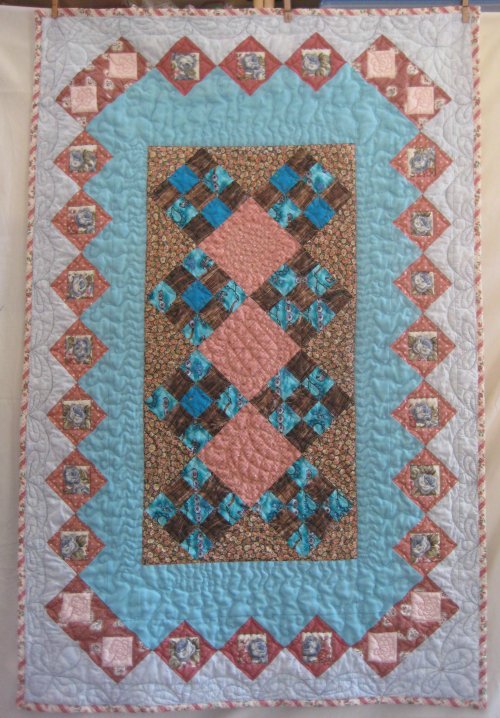
size: 36"x54"
First of all ... isn't this the *lamest* name EVER for a quilt?? Usually, when I'm working on a quilt, it's either from a commercial layout (and has a name) or something comes to mind as I'm working on it. Not with THIS quilt and I'm not quite sure why. It started out with the 9-patches and grew rather haphazardly to get to the finished size. Now that it's actually finished, I STILL don't have a real name for it. :-(
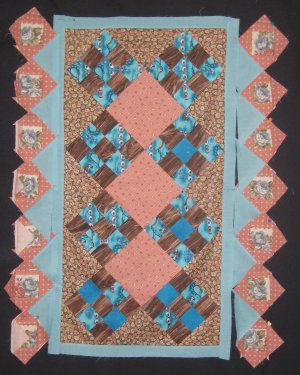 This top started out with alternating the 9-patches on point. Those alone were obviously too small to do anything with. On went setting triangles and a narrow border. Even with adding setting triangles and a narrow border, it was too small. Then I added square-in-a-square on-point blocks as another border.
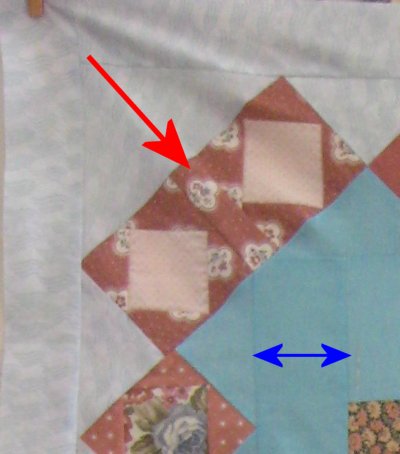 Once those borders were done, I realized the narrow border I initially sewed on was much too narrow and the pieced border wouldn't fit. ::sigh:: So, a replacement float border was cut and sewn on; see the double-headed blue arrow? That's the replacement float border. Compare that with the picture to the left, which had the original narrow float border. Yeah ... the replacement was substantially wider.
Then, the math for the top/bottom & sides of pieced borders and the alternating 9-patch center medallion weren't multiples of each other so the corners didn't turn out so well. See the red arrow? That's a spacing strip I put between the square-in-a-square on-point blocks. And see where it clips the corner of the float border? *That* corner was the best of the bunch. ::sigh:: ::shrug:: aaarrghhh!!
Stuff happens, ya know? :-)
I also kept running out of the coordinating fabric I had pulled from my stash. ::sigh:: I should have realized this was going to happen since the stash fabric was really remnants themselves, not yardage. ::sigh::
 Let's identify all the ... uh ... "challenges" I created for myself with this top:
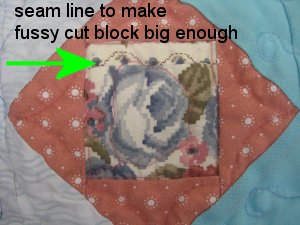 And talking about the floral fussy cut fabric ... there are some humilty pieces there, just so I could get the size I needed!
Not my best effort as far as pattern design goes, but the sewing is technically good.
Once the piecing ordeal was over, the quilting agony was about to start. Yes, figuring out the quilting design still harbors a lot of angst for me. Sometimes.
This was one of them.
I like to use the charity quilts as experimental pieces, so to speak. Something I can practice on a small scale without having to commit myself to a quilt that is Really Big.
I suspect that part of the enjoyment is the sneaky way the path is done so that the final result LOOKS like interlocking circles but you don't QUILT it that way. :-)
Mr. Pirate thinks they look like intestines, but I seriously disagree. :-)
Dang. Sometimes I really impress myself. :-)
The outer border is simply a whole bunch of setting triangles and corners. I found (someplace) a nicely undulating, continuous line arc and loopy design that would fit the space. However, after looking at it, I think I could have put some sort of "something" up into the apex of the triangle, but I didn't think of it at the time and I'm not going to go back to put that "something" in. I'll try to remember this lesson for next time.
One thing about quilting around the last border that I constantly need to remind myself about ... I can NOT quilt right up to the edge, unless it's an all-over design.
Why? Well, because after quilting, the raw edge will need to be squared and tidied up. That'll remove some fabric. At LEAST another 1/4" is going to be taken up by the binding; in my case, my binding tends to be about 3/8" wide. And this one specifically is about 1/2" only because the bias from my binding stash was cut at 2-1/2", a tad wider than I make these days .. and I didn't want to cut off 1/4" from all that bias to make a narrower edge. Yes, I am just that lazy. :-)
So, what I try to remember to do is to chalk a line about 1/2" away from the raw edge and use that chalk line as my outer edge. In this way, the quilted design won't be cut off or covered up. I use regular colored chalk; it washes right out, leaving no stain behind.
It's exceedingly annoying that I KNOW I need to do this yet sometimes completely flake on it. ::sigh:: I kinda/sorta remembered for this quilt. :-) I did chalk a line but the straightening up took more fabric away than normal and once the binding was sewn on, some of the baseline of the quilting got covered up. Ah well ... that's why these little quilts are for experimentation and reinforcement of lessons previously learned. :-)
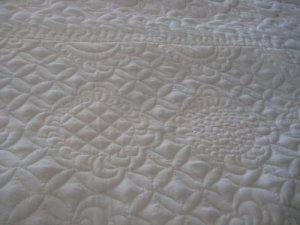
 The three big salmon on-point blocks in the middle read as a solid, so I could do something "fancy". A block motif, perhaps. Something circular? Something with feathers? Done! Each of the blocks got a circle surrounded by "Hooked on Feathers" by Sally Terry. (I looooooooooooooooooooooooove those hooked feathers! Easy. Dead easy. Looks impressive. My kinda feathers!) The interior of each circle was slightly different: pebbles (discovery: I don't like doing pebbles. They take FOREVER. Look nice but what a bear to do!), cross-hatched and curved cross-hatched.

 The 9-patch blocks got a continuous curve. I just really, really like the look of the continous curve and tend to use it a lot. Maybe I'm just lazy so that I return to this favorite and do it without too much thought ... but I really like it!
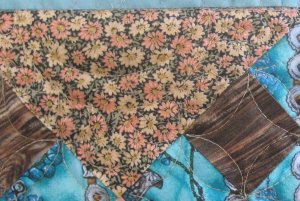 The setting triangles are of a busy print. Normally, I don't put anything fancy or intricate on busy print fabric because you JUST DON'T SEE the quilting; the print simply swallows the design up. BUT, since this was for experimentation, I did a half circle with the hooked feathers on the outside in each of the setting triangles. Can't see the quilting, can you? Point made. :-)
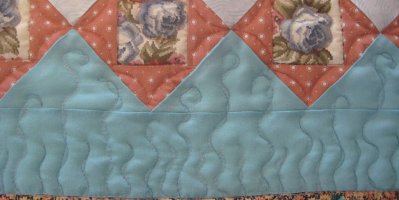 Which leads us to the 800 lb gorilla in the quilt ... that big expanse of turquoise. I started perusing Darlene Epp's set of books, "Pocket Guides to Free Handing". I loooooooooooooooove these books! :-) I found the "Sea Weed" design in the Borders & Sashings book and used a variant of it in the turquoise. It looks weird in some way .. but I like it. :-)
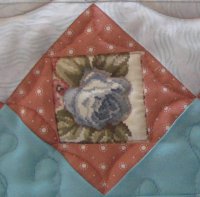 Onwards to the pieced square-in-a-square on-point border ... this was another no-brainer for me: continuous curves! :-) The fussy cut floral in the square was outline stitched to give it some definition.
 But, if you remember, the corner square-in-a-square blocks don't have the fussy cut floral. I had run out of it and used a dot fabric instead. On this blank palette, I free motioned my own flower ... another design from one of the Darlene Epp books. I have to admit .. I am SO pleased with these flowers! They look complicated but following Darlene's excellent diagrams, they are *dead easy* to do.
 Finally, finally, we arrive at the very last outside border. My goodness .. I thought we'd never get here! :-)
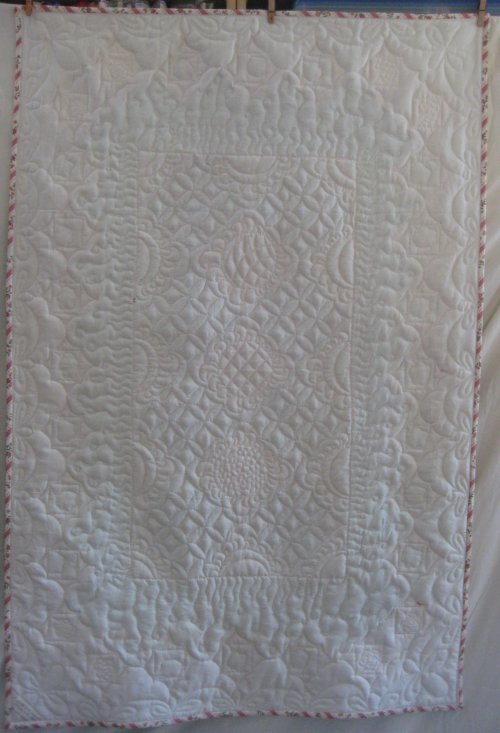 The quilting, as viewed from the back, looks pretty doggone terrific, don't you think? I know I do. :-)
![]() Quilting Home page
Quilting Home page