Sawtooth Star #1

size: 36"x44"

Whilst waiting for my quilting thead to arrive in the mail (so I could finish the quilt that's on Lizzie), I was making other tops by delving into my cubbies and dragging out OLD projects, looking through my bookshelf and picking out an interesting book but mostly trying to use up my stash fabric.
One such OLD project happened to be a year 2000 swap, when our online Quilting Forum was on Delphi, not About.com. Year 2000 was when I really seriously got into quilting and was joining swaps right and left, without realizing that all those swaps were, as fun as they were, simply generating *more* projects! After this realization, I stopped swapping. :-)
When I pulled out the blocks from this swap, I also rediscovered the reason why swaps are risky .... because you have so many participants of different skill levels, you are going to get blocks of various quality. The block of this swap call for this block to be 12" finished, but the swap hostess must have given us different cutting directions because the blocks that I have came out to be 8" finished.
Or ... at least they were SUPPOSED to be 8" finished (this means that the unfinished, raw block needs to be 8-1/2" square). Of the 11 blocks I received, fully 6 of them were 8" unfinished. Sadly, those blocks would not be able to play with the other swapped blocks, which *were* 8-1/2" unfinished.
Since I now had a reduced inventory of blocks to work with, I decided to make 2 charity quilts with the appropriately sized blocks. For those that were 8" unfinished, I alternated them with a plain fabric square, resulting in a center medallion. I have a specific, minimum size for the quilts I make and I needed to put on some borders to make this quilt the proper size. I surrounded the medallion with a narrow dark blue border, then a border of pieced 4" blocks then a final, wider outer border.
Deciding on what the 4" pieced block was going to be was determined by a rediscovery of a specialty ruler set.
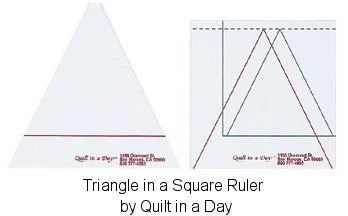 I'm not one for having a bunch of specialty rulers. Most of the time, it's possible to get what you need with math and a standard quilting ruler. Sometimes you really do need a specialized ruler but not usually. Recently, when doing a semi-Spring Cleaning of my sewing area (please note that I did NOT say the sewing *room*!), I rediscovered a specialty ruler set. It's "The Triangle in a Square Rulers" by Eleanor Burns (of Quilt in a Day). I have NO idea why I bought it or even how long ago, but I'm sure it was an impulse item. I'd even toyed with the idea of selling because ...heck .. who needs it?
The triangle this ruler set produces is an equilateral or 60° triangle. This is what 1000 Pyramid quilts are made of and any 60° triangle ruler will produce this shape in varing sizes. But, I needed a square block, not just the triangles. This was a slightly different problem. Now, equilateral triangle blocks are not Flying Geese nor are they half-square triangles. They are 60° triangles with setting triangles on either side which results in a square block. Making the equilateral triangle blocks turned out to be surprisingly easy with this ruler set!
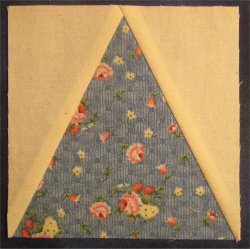 Since this ruler set produces a 4" (finished) block. Why not give it a whirl? I've gotta say that I think this ruler set is my newest, most favorite tool! :-) :-) It is absolutely *dead* easy to make 3" or 4" (finished) equilateral triangle blocks. Not only does it have a template to easily cut the 60° triangles (in fact you may already have such a ruler in your tool kit) but also has directions on how to cut the oddball setting triangles and a template that you use to trim the block to create the finished block with the equilateral triangle smack-dab in the middle of the block.
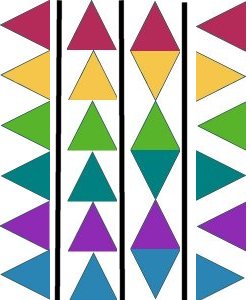 Once I had all those lovely, lovely square blocks with that perfect equilateral triangle in the middle, how should I USE them? Using Electric Quilt, I played around with different layouts and came up with four that were attractive. I ended up using the one on the far left ... but .... I have to admit that the one on the far right is very intriguing. I'll need to remember this layout for another quilt.
A quilting associate of mine asked why I didn't just use ALL equilateral triangles for the border? An excellent question, since the final layout does look like that. But, if you remember, the BLOCK I had made was of an equilateral triangle with setting triangles on the sides. Those setting triangles are actually HALF of an equilateral triangle, so when you put the two halves together .. you get a whole one! If you look closely at the big picture up top or at the detail picture below, you can see the seam line down the middle of the muslin triangles.
I love this set! :-) And no ... you may not buy it from me. Get your own.
As I have been doing with these charity quilts, I am trying to do something different each time with the quilting. I view these quilts as an opportunity to move outside of my comfort zone and "take a risk". I gotta admit, it's scarey. I want these quilts to look nice but I also need quilt tops to practice my risk-taking on before I attack the bigger, bed-sized quilts. Much better to make any mistakes and learning goofs on a smaller quilt!
I have learned that you (well ... *I*) need a template to make curved lines look nice and smooth. My freehand curves aren't consistent enough to look good when you want to make a pattern with those curves. (My freehand curves for meandering is fine because there is no regularity with meandering.) Fortunately, I have been building up my template inventory so I *can* do nice curves.
However .. back to that risk-taking thing ... time for another confession: I'm a big chicken. :-) I've discovered that I can do and like certain motifs in certain areas and have them look decent. It's good to have these fall-back, tried-and-true designs in your arsenal, but I really need to step away from them! Did I do that for this quilt? Uhhhh ... no. :-)
As for the equilateral triangle blocks .... I was thinking of a wedge shaped motif that could be inverted so the design could be stitched continuously. But I couldn't find anything that was sufficiently simple enough that I liked. (There's no chance that I'm going to come up with an original motif ... I don't have an original design bone in my body, so I just don't try to beat my head against that brick wall.) Once again, I fell back on a tried-and-true continuous petal design that I like. I have an oval template that provided me with a lovely curve.
And that left the center Sawtooth Star blocks. I'm not too happy about a lot of starts and stops. I don't feel confident that merely taking small stitches at the end of stitching will hold sufficiently through a lot of launderings, so I tend to bury my thread tails (made much, much easier with a self-threading needle). But even with a self-threading needle, if there are a lot of starts & stops, you're going to have a LOT of tails to bury.
You can bury them as you go, so you don't have the entire amount to do when you're finished, but you break your stitching rhythm. If you wait until you're done stitching, it looks like you have ANOTHER project to do: bury all the tails! There's just no winning this game ... so I try to limit my starts and stops.
You can't tell from the quilt itself, but the design is actually flipped on the Sawtooth Star block ... I've drawn it in so you can see it.
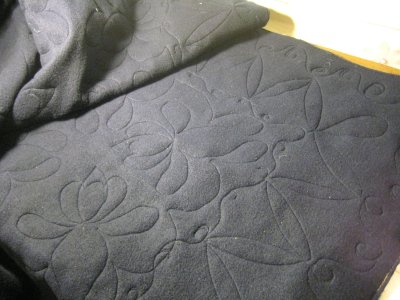 When it came time (eventually) to quilt the top, I had rediscovered something else in my supplies: fleece yardage! The fleece yardage had been purchased to be used as backing for quilts. Here in California, we don't have sub-zero winters and a top backed with fleece-only is sufficiently warm most of the year.
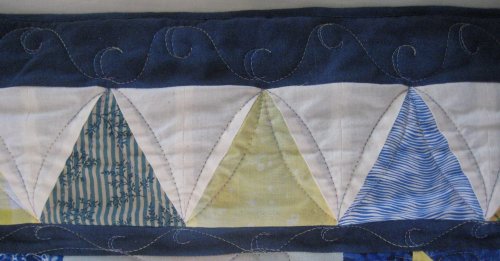 One border/sashing motif that I really, really, really like is Carla Barrett's 'Swirly Designs for Borders & Sashings'. Once I figured out what the rhythm was, it's become my all-time favorite. And because it's my favorite, I immediately think to use it .. all the time. So I did .. in both the wider outer blue border, as well the narrow inner blue border. No real challenge there, but I sure to like the way it looks! :-) Carla gives a LOT of different variations for this swirly design, but I just keep doing the basic one, since I don't have to think about it. Perhaps that will be my next challenge when using this design ... stitch a variation! :-)
 I hauled out my quilting books ... and I rediscovered another section of them in my bookshelf! ... and found a continuous line design (of absolutely nothing at all .. it's merely a continuous, swirly abstract) that wasn't too complicated. Eventhough I want to do something new on these charity quilts, I'm realistic enough to know that I don't want to spend a LOT of time on them, so an interesting-yet-not-simple-and-not-complicated design was what I was looking for. It turned out that this design was a real bear to stitch! Because it's not a real "anything", I didn't have a frame of reference for drawing it. This was particularly apparent when the design was reversed (every other block). I ended up drawing directional arrows on the pantograph so I wouldn't become (more) confused about which line to be on!
![]() Quilting Home page
Quilting Home page