Celtic Lone Star
Date made: October 2000 and almost re-finished as of 2004
Date finished: WOO HOO! March 2006
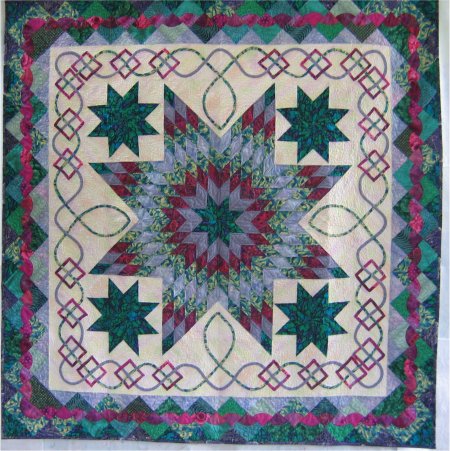
 One of my local quilt stores is Thimble Creek. They always hang full scale quilts a/o tops of the projects that they are going to have classes for. One such top was a Lone Star (aka Star of Bethlehem), taught by Laura Nownes, a local quilter. I have always loved the Lone Star pattern; it is so dramatic. I *loved* the teacher sample. So I signed myself up for the class.
Now, bear in mind that I was just entering the quilting scene. I had not been in the "info loop" on who was who in the quilting world, what was currently hot or what the current trends were. I just knew what I liked (which, actually, is a very good reason to take a class, whether or not it's topical). Using the class supply list, I went through my stash (because one thing I was trying to do was to use the fabric in my stash -- I had bought it so I must have loved it at some time!) and pulled fabric that I thought would go nicely together. However, color theory is an entirely separate aspect of quilting, one that I'm not entirely conversant with. I knew that I needed some more/other fabrics for the Lone Star but didn't really know what was missing. Bringing my fabric selections with me to the store the week before the class started, I got help from the store staff on color selection on which fabrics in my stash played nicely with each other and which additions from their inventory would add just the right amount of punch and spark.
Armed with my class supplies and fabric, I arrived in class. Little did I know, but rapidly discovered, that Laura Nownes is a nationally published and recognized quilting insructor. She regularly teaches workshops at Asilomar with her quilting partner and co-author, Diana McClune. AND Laura *LIVES IN WALNUT CREEK*. Oh. My. God. Who knew??? Well, apparently the entire rest of the quilting world knew, but not me. :-)
Laura is the most *patient* instructor. She is clear, concise yet explains herself in such a manner that everyone understands what steps they need to do at each stage of the project. After giving an over-all explanation and some preliminary detailed instructions of the step we were to do, she then goes around to *each student in the room*, sits by their side and guides them through whatever problems they might be having *until they understand what they need to do*. I was astounded by the degree of attention she lavishes on her students. Endlessly patient, she the most amazing instructor I've ever had. If you ever have the opportunity to take a class from Laura, do not pass it up. You will not be disappointed.
Week by week, we worked on our Lone Star components. Laura taught us her technique that assured us of an exact seam allowance for our personal machine and showed us how to make Lone Stars using a staggered strip set technique. With her instructions, we made not only the central Lone Star but the 4 corner Lemoyne stars with PERFECTLY FLAT CENTERS. No volcanos or "D" cups in the entire class! That alone was amazing! We also learned the way to properly set-in a "Y" seam so that there were no puckers or gaps at the inner corner. Incredible!
The outer pieced border was next on the list ... the feature design is a very small Drunkard's Path block set on-point. Now, Drunkard's Path has never been a favorite block of mine .. I really don't care for bulls-eye kind of designs ..but *this* variation in the border was stunning. She taught us a nifty technique of folding and making 3 clips in the Drunkard's Path pieces so that sewing the concave and convex curves are virtually painless and the final block comes out flat and square. Truly, her techniques are wonderful.
A small digression:While many students used scissors to cut out the small Drunkard's Path pieces, I was able to zip-zip-zip through it by using the small 28mm rotary cutter with my plastic templates. The cut-out leftovers were so perfectly formed that I determined to do something ..anything .. with them. At the end of class, I sat at my table and played with the cut-out pieces, moving them around to different configurations. Laura must have noticed and been curious because she walked over to where I was in the corner to watch me play. I explained that the pieces were cut so nicely that I just couldn't throw them away. She chuckled and said that she could actually see the wheels turning in my head!
At home, during the intervening week, I finalized the design and constructed a very simple design with raw edge applique by machine that resulted in a long, narrow wall-hanging. I was actually quite pleased with it. I backed it with some fabric that I had garnered from my mother's stash .. it had the same vibrant colors as the front, although it was most definitely a 1960's design! As an aside, my older brother came to visit and admired the wall-hanging. This was truly astounding, since if an item isn't cars or guns, my brother doesn't really pay attention. When I mentioned that the back of the wall-hanging was of our Mom's fabric, he was much intrigued. While he was engrossed in conversation with Mr. Pirate, I quickly put a hanging sleeve on it, as well as one of my nifty pirate labels and gave it to him right then. He *was* surprised ... but not as much as I was when we visited his house ... he had turned the wall-hanging so that the backing .. our Mom's fabric .. was showing! I was really puzzled and asked him why .. he said that the label was so neat, he thought that was the side that was suppposed to show!!! End of digression. :-)
Back to the class:
She then led us through some simple math figures to calculate how big to make the float border in between the Lone Star center medallion and the Drunkard's path border so that it fit perfectly between the two.
While I was constructing the various parts of this project, I became aware that Laura was not a rigid sort of instructor .. if you didn't care for some element of the quilt, she would help you figure out how to do what you wanted to do. It turned out that the more I looked at her country-style vines and flowers, the more disenchanted I became with them. Country-style decorating is just not *me*. However, I do adore Celtic knotwork. With Laura's help and assistance, I constructed my own Celtic knotwork design to replace her country vines. Because my design was wider than her vines, my float border needed to be wider to accomodate it, but she helped me with those figures also.
Then I got stupid. Really stupid. I was sooooo eager to finish this beautiful quilt .. the quilt that I had sewn so nicely that all the centers to all the stars were so perfectly flat .. the quilt where the curved seams of the Drunkard's Path borders were sewn without any puckers .. the quilt that was looking so wonderful. Well, I made all the bias I needed for the Celtic knotwork. I lightly drew the Celtic design on the quilt top and laid the bias on the lines. And I wanted it done. I didn't want to take it back to class for the last class with pins sticking all over the place ... I stupidly wanted the Celtic knotwork design DONE.
So, I machine top-stitched the Celtic bias strips down.
Yes, I used matching thread ... I wasn't THAT stupid. But. But. But .. when I had taken the last stitch and looked at my beautiful quilt, I knew the machine top-stitching was a MAJOR MISTAKE. What an utter idiot I was. All because I didn't want to take the time to start sewing the Celtic knotwork design by hand, as it really should have been done. I think Laura was disappointed in how it looked and that really, really made me feel very badly.
So, I packed it away for a while .. I was to dejected to rip out all that stitching so soon. However, eventually, I pulled it out once more and began the tedious job of removing all the machine top-stitching. As I ripped a section, I would immediately hand-applique it in place .. the way it SHOULD have been done originally. What's that adage? "Enjoy in haste; repent in leisure"?? Well, no statement was ever so appropriate as that one. Or, as my parents used to tell me, "If something is worth doing, it's worth doing well". If only I had heeded that wisdom, that quilt would have been done!
So, here it is in 2004 .. an entire four years after the class. The Celtic knotwork still hasn't been completely corrected, but I'm steadily working on replacing all the totally incorrect machine top-stitching (HOW STUPID!) with hand applique.
Flash forward to March 2006
Oh, happy, happy day! All the hand stitching has been completed. The top & backing have been taken to Janna Bailey of the The Quilting Company for long-arm quilting. Janna did her usual quilting magic and a spectacular top is now a fantastic, finished quilt! I am soooooooooooooooooooooo HAPPY!